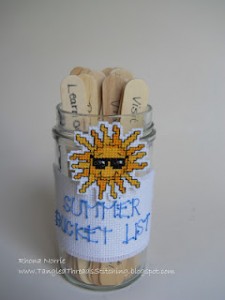
 Not only is this a cute free chart, it is a cute idea for a summer project. Whip up your list, then stitch up this project for a fun family project. Get the free chart.
Comments
Have you read?
Designer Spotlight: Murder Puffin
 I’ve long had a soft spot for puffins, so of course when I found an Etsy shop called Murder Puffin I had to share it.
And I’m so glad I found it because they’ve got some weird stuff that I hope you’re going to like as much as I do.
There are cryptids and true crime, nautical themed designs, holiday wanted posters and an entire section called memento mori. So if that sounds like something you’d be into, read on.
The biggest section on the site, though, is Altoid tin cross stitch patterns. If you can’t quite imagine what an Altoid tin cross stitch pattern would be like, this mummy cross stitch tin is a pretty representative example.
Most of them have a character (in this case, the mummy, but it could be anything from an alien to a racoon to a gnome) or more than one, who is made into a tiny stuffed doll. There’s a design for the top and bottom inside of the tin; here it’s a pyramid and an anhk design. There’s also a small design for the top of the box. And finally, a kind of blanket and a pillow so you can tuck your little character into the box.
Each one is a cute little set that would be so fun to display (and play with!) on your desk or bookshelf. And there’s a great range of options to choose from.
In addition to those, you’ll find a lot of other fun stuff for the strange and unusual on your gift list. There are some delightfully creepy (and mostly cryptid-inspired) tarot cards. A whole set of dark samplers called Gothic murder family. And a section called potted cross stitch, with little designs like mushrooms, plants and pumpkins you can stitch up and “plant” in tiny pots.
There’s so much fun stuff you really just need to stop reading this and go visit Murder Puffin on Etsy. I hope you find it as delightful as I do!
[Photo: Murder Puffin]
I had never heard of a “Bucket List” until the other day when a friend said she would add a trip to Alaska to her “Bucket List”. Today I saw your pattern and knew I needed to make one for her. Thank you so much for the free idea and pattern.
Thank you for the really neat idea and the free pattern. Going to start today.