• Home
  • Suggest A Craft
  • DIY Newsletter

Cross-Stitch

Charts, patterns and everything needlepoint

  • About CraftGossip
  • Our Network
    • Bath & Body Crafts
    • Candle Making Ideas
    • Crochet Ideas
    • Cross Stitch
    • Edible Crafts
    • Felting Patterns
    • Glass Art
    • Home & Garden Ideas
    • Indie Crafts
    • Jewelry Making
    • Kids Crafts
    • Knitting Patterns
    • Lesson Plans
    • Needlework
    • Party Ideas
    • Polymer Clay
    • Quilting Ideas
    • Recycled Crafts
    • Scrapbooking
    • Sewing Patterns
    • Card Making
    • DIY Weddings
    • Not Craft Ideas
  • Giveaways
  • Roundups
  • Store
  • Search

All about Cross-Stitch Needles

March 15, 2023 by Sarah White

I do cross stitch from time to time, but I haven’t ever given much thought to the supplies I use to do it. I have always used whatever I happened to have access to, including whatever needle was nearby.

That means I’ve done cross stitch with sewing needles, and with blunt needles meant for yarn, too.

But did you know there are different kinds of needles that are just for cross stitch and embroidery?

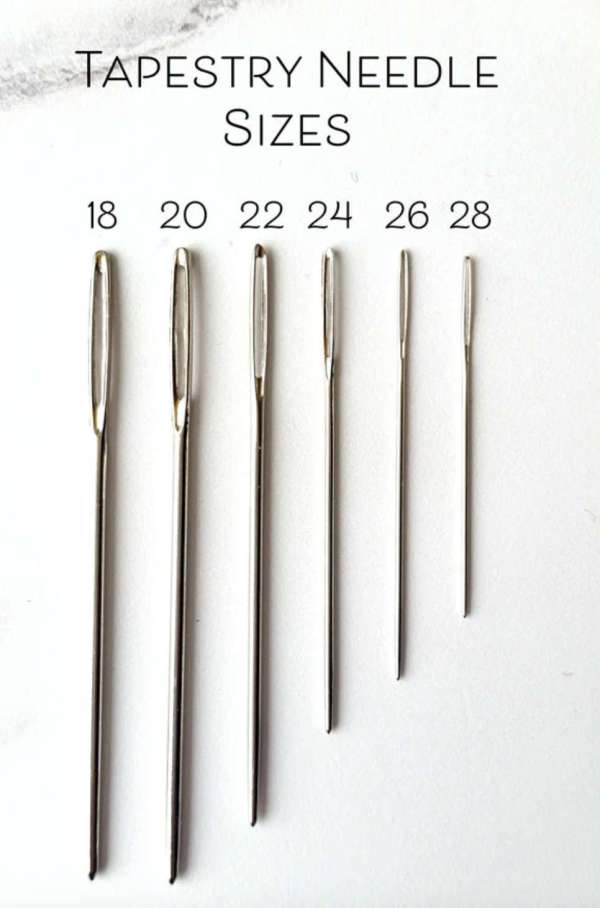
Tapestry needles are the needles that are made for working cross stitch and embroidery, and just like my yarn needle, they aren’t sharp, though tapestry needles meant for cross stitch are smaller than the ones used to seam knitting or crochet projects.

In fact there’s a range of sizes, and it’s best to use different needles depending on the size of fabric you’re using. Which makes sense, because different sized fabric has slightly different sized holes for the needle to go through.

Gathered has a great guide to tapestry needle sizes, but in general as the count of the fabric goes up, the number size of the needle also goes up, but that means that the needle itself is getting smaller. So for example for working on 14 count fabric you’d want to use a size 24 needle, whereas for 16 count fabric you’d use a 26, which is actually a little smaller.

Larger holes in your cross stitch fabric can accommodate larger needles, and if you’re stitching on something like burlap you can use a large needle like my yarn needle. When stitching on fabric instead of cross-stitch cloth, you’ll want to use a smaller needle or go to a sharper sewing needle if you’re having trouble piercing the fabric (which may happen if you’re stitching on a thick fabric).

Do you pay attention to the type of needle you use when you cross stitch? Have you found there’s a difference when working with different fabrics? I’d love to hear about it!

[Photo: Stitched Modern.]

Next Pattern:

  • 35+ Sunflower Cross Stitch Patterns
«
»

Have you read?

Check Out This Great Method for Framing Cross Stitch

When you put all the time and energy you do into making a great cross stitch project, it’s worth taking the time to frame it in a way that will make it look its best.

Often for smaller designs we’ll choose to frame projects in a hoop, which is cute and a fine option, especially for seasonal projects you might want to change out through the year. Others will send their finished projects for professional framing, which is a great option for gifts and heirloom items that need to be preserved, but it can also be quite expensive.

Crewel Ghoul has a great tutorial for a way that you can easily frame your cross stitch projects at home with just a few supplies.

She uses adhesive mounting board (but you can use non-adhesive board if you have some one hand or you need a size that’s not available in an adhesive version) and a few other basic supplies to secure the sides and corners of the cross stitch fabric around the board before putting the design in the frame.

This requires a bit of hand sewing, but we’re cross stitchers so I’m sure we can handle that.

Framing your cross stitch like this gives it a little padding in the frame, which makes it look better than if it were just flat in a frame with no special finishing. It’s also a great idea to use a frame without glass or to leave the glass out of the frame so it doesn’t crush your stitches.

And though this is super secure it’s not 100 percent permanent if you decide you don’t want the project framed in that way any more. Or you can take it out of the frame and the edges are still all nicely finished so you can display it a different way without having to do anything else to it.

Check out the tutorial at Crewel Ghoul.

[Photo: Crewel Ghoul.]

Categories

Book Reviews Christmas Craft Businesses Craft Inspirations Craft News and Events Cross-Stitch Patterns & Charts Cross-Stitch Product Reviews Cross-Stitch Website Reviews Dogs & Cats Easter flowers Free Patterns Halloween More Cross Stitch Product Reviews spring Subversive Thanksgiving Tutorials and Patterns valentines day

RSS More Articles

  • Etsy Spotlight – Sew Your Dream Cottagecore Midi Dress with This Beautiful Sewing Pattern
  • How to Make a Garden Planner with Scrapbook Supplies
  • Learn about China for Kids
  • Check Out This Great Method for Framing Cross Stitch
  • Teddy Family – Free Crochet Patterns
  • Book Review – Americana Quilts
  • Add a Splash of Joy to Your Crafts with The Big Book of Happy Crafts
  • 5 FREE Die Cut Father’s Day Interactive Cards
  • DIY Purse with Cricut Maker: A Fun and Easy Sewing Project
  • Free Pattern – Queen Anne’s Lace Meadow

Pick Your Blog

  • Sewing
  • Knitting
  • Quilting
  • Crochet
  • Home & Garden
  • Recycled Crafts
  • Scrapbooking
  • Card Making
  • Polymer Clay
  • Cross-Stitch
  • Edible Crafts
  • Felting
  • Glass Art
  • Indie Crafts
  • Kids Crafts
  • Jewelry Making
  • Lesson Plans
  • Needlework
  • Bath & Body
  • Party Ideas
  • Candle Making
  • DIY Weddings
  • Not Craft
  • Free Craft Projects

Copyright © 2025 · CraftGossip | Start Here | Contact Us | Link to Us | Your Editors | Privacy and affiliate policy