• Home
  • Suggest A DIY
  • DIY Newsletter

Cross-Stitch

Charts, patterns and everything needlepoint

  • About CraftGossip
  • Our Network
    • Bath & Body Crafts
    • Candle Making Ideas
    • Crochet Ideas
    • Cross Stitch
    • Edible Crafts
    • Felting Patterns
    • Glass Art
    • Home & Garden Ideas
    • Indie Crafts
    • Jewelry Making
    • Kids Crafts
    • Knitting Patterns
    • Lesson Plans
    • Needlework
    • Party Ideas
    • Polymer Clay
    • Quilting Ideas
    • Recycled Crafts
    • Scrapbooking
    • Sewing Patterns
    • Card Making
    • DIY Weddings
    • Not Craft Ideas
  • Giveaways
  • Roundups
  • Store
  • Search

An Easy Way to Keep Cross Stitch Fabric from Fraying

April 2, 2025 by Sarah White

If you’ve been cross stitching for a while, you might have heard of this hack before, but for our newer stitchers I wanted to mention it since I came across it again recently on the Koekoek blog.

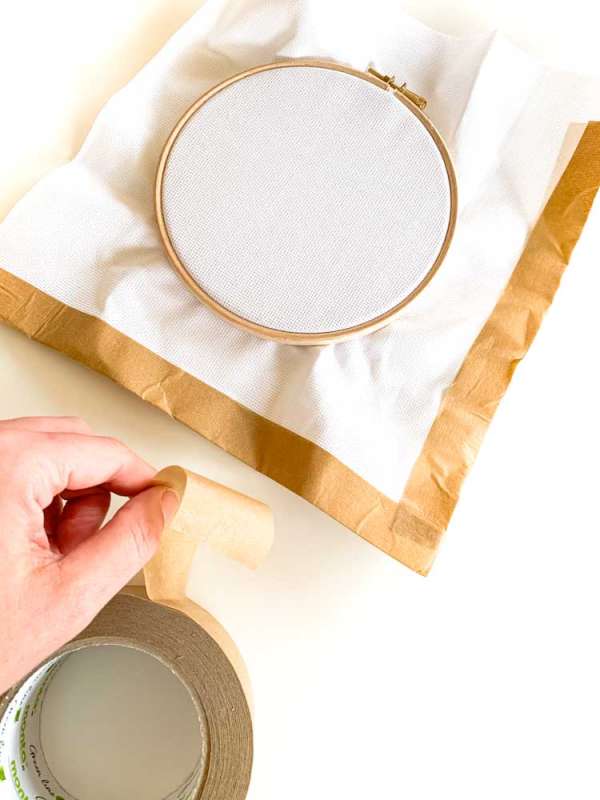
One of the potential problems with working with cross stitch fabric is that it is woven, so it can fray along the edges while you are stitching. If your fabric is bigger than you need for your project this is merely annoying, but if you’ve cut your fabric to the size you want your project to be when you frame it, you don’t really want to lose a lot of fabric on the sides.

There are lots of potential ways to stop this fraying, including stitching the edges with blanket stitch, but if you don’t want to take that kind of time on something that other people will never see, an easy way to stop the fray is with painter’s tape.

My mom used to do this on her projects (I think she used masking tape, not painter’s tape, but it’s the same idea) and it is helpful, especially if you’re working on a big project that’s going to be exposed to potential fraying for a long time.

Of course you’ll want to remove the tape when you’re done stitching, and then you can finish the edges in another way or just tuck them inside your frame, depending on how you plan to finish the project.

I also sometimes use tape to position a project in a frame, like I did with this upcycled yarn wrapped picture frame that has a cross stitch piece in it. Painter’s tape is nice because it removes easily and cleanly and is easy to reposition if you need to move your project around or you decide you don’t want it framed like that any more.

Learn all the details of this technique over at the Koekoek blog. And let me know what you do to stabilize the edges of your projects while you’re stitching!

[Photo: Koekoek]

Next Pattern:

  • Quick Tip: How to Keep Cross Stitch Fabric from Fraying
«
»

Have you read?

Everything You Need to Know About Embroidery Hoops

One of the most common supplies for cross stitch, aside from fabric, needles and floss, is an embroidery hoop. A hoop isn’t needed for every project, and indeed there are some stitchers who prefer not to use them at all. I generally don’t use a hoop when I’m working on a small cross stitch project, especially something that’s shape isn’t conducive to using a hoop (like a bookmark). 

But embroidery hoops can be really helpful for cross stitch because they hold your fabric at an even tension, which allows you to stitch more evenly without any more work on your part. It’s great for beginners to use hoops because the tension on the fabric can both help make your stitches more even and make the holes in the fabric a little easier to see. 

I’ll admit to always just buying whatever hoop is available in the right size when I’m ready to start a project without giving it much more thought than that. But there are things you should consider when choosing among the different kinds of hoops, which Caterpillar Cross Stitch covers in their great guide to embroidery hoops. 

The post walks you through wooden, plastic, spring tension and flexi hoops (which I’ll admit to having never heard of; they’re made of vinyl and plastic apparently), as well as Q-Snap frames, which aren’t really hoops because they’re made of plastic tubes that you snap together in the size and shape you need. 

It also covers what size hoop you should use for the project you’re working on and how to actually use a hoop in the right way. 

Whether you’re new to cross stitch or more seasoned, you’re sure to pick up a tip or a product to try in this post, so go check it out over at Caterpillar Cross Stitch. 

Do you have a favorite kind of embroidery hoop to use for cross stitch, or do you go without? I’d love to hear your thoughts!

[Photo: Caterpillar Cross Stitch]

Categories

Book Reviews Christmas Craft Businesses Craft Inspirations Craft News and Events Cross-Stitch Patterns & Charts Cross-Stitch Product Reviews Cross-Stitch Website Reviews Dogs & Cats Easter flowers Free Patterns Halloween More Cross Stitch Product Reviews spring Subversive Thanksgiving Tutorials and Patterns valentines day

RSS More Articles

  • Everything You Need to Know About Embroidery Hoops
  • Needle Felting Fairy Tutorial by Santa Meada
  • Printable Stickers for Journals and Planners – Self Care
  • Stitch Your Favorite Fruit on a Sweater
  • 12 Color Wheel Inspired Scrapbook Layouts
  • Crafts With Old Bricks: Creative Ways To Upcycle Leftover Bricks
  • How To Make A Milk Mache Molding Compound
  • The 5 Outlet Placement Mistakes You Don’t Want to Make
  • Celebrate the Spirit of the Southwest with These Stunning Indian Navajo Tribal Quilt Patterns
  • Pricing Handmade Sewing Items Without Undervaluing Yourself

Pick Your Blog

  • Sewing
  • Knitting
  • Quilting
  • Crochet
  • Home & Garden
  • Recycled Crafts
  • Scrapbooking
  • Card Making
  • Polymer Clay
  • Cross-Stitch
  • Edible Crafts
  • Felting
  • Glass Art
  • Indie Crafts
  • Kids Crafts
  • Jewelry Making
  • Lesson Plans
  • Needlework
  • Bath & Body
  • Party Ideas
  • Candle Making
  • DIY Weddings
  • Not Craft
  • Free Craft Projects

Copyright © 2026 · CraftGossip | Start Here | Contact Us | Link to Us | Your Editors | Privacy and affiliate policy