• Home
  • Suggest A Craft
  • DIY Newsletter

Cross-Stitch

Charts, patterns and everything needlepoint

  • About CraftGossip
  • Our Network
    • Bath & Body Crafts
    • Candle Making Ideas
    • Crochet Ideas
    • Cross Stitch
    • Edible Crafts
    • Felting Patterns
    • Glass Art
    • Home & Garden Ideas
    • Indie Crafts
    • Jewelry Making
    • Kids Crafts
    • Knitting Patterns
    • Lesson Plans
    • Needlework
    • Party Ideas
    • Polymer Clay
    • Quilting Ideas
    • Recycled Crafts
    • Scrapbooking
    • Sewing Patterns
    • Card Making
    • DIY Weddings
    • Not Craft Ideas
  • Giveaways
  • Roundups
  • Store
  • Search

Beetlejuice Cross Stitch Patterns

September 6, 2024 by Sarah White

With the release of the new Beetlejuice movie and Halloween sneaking up on us, it seems like a good time to share some Beetlejuice cross stitch patterns.

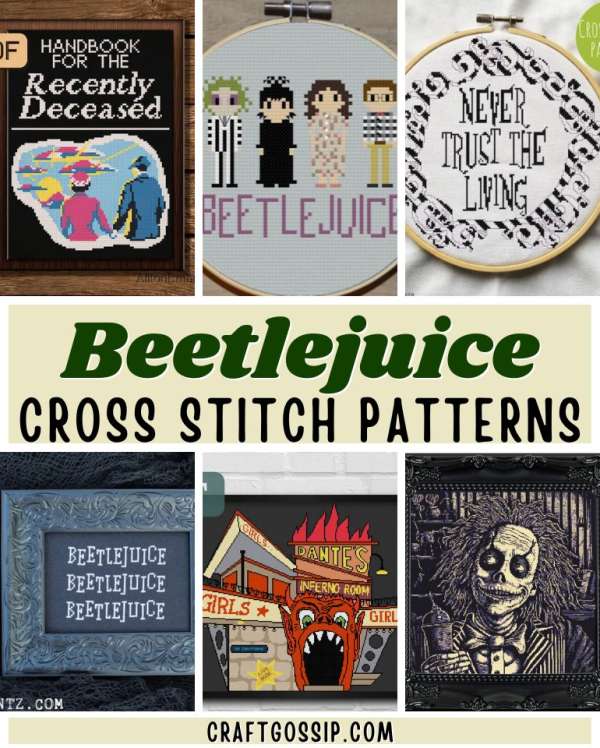
At the most basic there’s the Beetlejuice, Beetlejuice, Beetlejuice pattern from Brianna Lentz. This free pattern is worked in a single color and is a perfect fit for a 5×7 picture frame.

We also know we should never trust the living, as this design from Avocado Stitchery reminds us. This one also uses only one color but has a lot of back stitching to make the design around the lettering. It’s made to fit in an 8-inch hoop.

One of the most iconic items in the original Beetlejuice movie is the Handbook for the Recently Deceased, and you can stitch the cover with this pattern form Aliton Embroidery on Etsy. It uses six colors and measures 84 by 112 stitches. That’s 6 by 8 inches or 15.24 by 20.32 cm on 14 count fabric. The designer suggests using black or chocolate brown fabric for this one to mimic the book in the movie.

Stitch up cute versions of the Beetlejuice characters with this design from Geeky Stitches. I can’t wait for some of these from the new movie! This set includes Beetlejuice, Lydia, Barbara and Adam and is 80 by 70 stitches. It comes out to 4 by 3.21 inches, or 10 by 8.15 cm, on 14 count fabric and uses 17 colors.

Or you can stitch a creepy version of Beetlejuice himself with Raven Stitch Craft’s design. This woodcut style design is a showstopper that uses six colors and has a stitch are of 233 by 233 stitches. On 14 count fabric that comes out to 16.6 inches or 42.3 centimeters.

For another big and dramatic project from the movie, check out zegihoops‘ design for Dante’s Inferno Room. This one is 238 by 190 stitches, or 17 by 13.6 inches (43.2 by 34.5 cm) on 14 count fabric (both of these patterns offer other fabric options to make it larger or smaller).  While the size of it might make it more of a challenge, it also looks like it would be a lot of fun to stitch for a Beetlejuice lover.

Next Pattern:

  • Funny Avocado Cross Stitch Patterns
«
»

Have you read?

Check Out This Great Method for Framing Cross Stitch

When you put all the time and energy you do into making a great cross stitch project, it’s worth taking the time to frame it in a way that will make it look its best.

Often for smaller designs we’ll choose to frame projects in a hoop, which is cute and a fine option, especially for seasonal projects you might want to change out through the year. Others will send their finished projects for professional framing, which is a great option for gifts and heirloom items that need to be preserved, but it can also be quite expensive.

Crewel Ghoul has a great tutorial for a way that you can easily frame your cross stitch projects at home with just a few supplies.

She uses adhesive mounting board (but you can use non-adhesive board if you have some one hand or you need a size that’s not available in an adhesive version) and a few other basic supplies to secure the sides and corners of the cross stitch fabric around the board before putting the design in the frame.

This requires a bit of hand sewing, but we’re cross stitchers so I’m sure we can handle that.

Framing your cross stitch like this gives it a little padding in the frame, which makes it look better than if it were just flat in a frame with no special finishing. It’s also a great idea to use a frame without glass or to leave the glass out of the frame so it doesn’t crush your stitches.

And though this is super secure it’s not 100 percent permanent if you decide you don’t want the project framed in that way any more. Or you can take it out of the frame and the edges are still all nicely finished so you can display it a different way without having to do anything else to it.

Check out the tutorial at Crewel Ghoul.

[Photo: Crewel Ghoul.]

Categories

Book Reviews Christmas Craft Businesses Craft Inspirations Craft News and Events Cross-Stitch Patterns & Charts Cross-Stitch Product Reviews Cross-Stitch Website Reviews Dogs & Cats Easter flowers Free Patterns Halloween More Cross Stitch Product Reviews spring Subversive Thanksgiving Tutorials and Patterns valentines day

RSS More Articles

  • Learn about China for Kids
  • Check Out This Great Method for Framing Cross Stitch
  • Teddy Family – Free Crochet Patterns
  • Book Review – Americana Quilts
  • Add a Splash of Joy to Your Crafts with The Big Book of Happy Crafts
  • 5 FREE Die Cut Father’s Day Interactive Cards
  • DIY Purse with Cricut Maker: A Fun and Easy Sewing Project
  • Free Pattern – Queen Anne’s Lace Meadow
  • FREE Sun and Waves Die Cut File Download
  • A Blanket Knitting Pattern Where Yarn Selection is Everything

Pick Your Blog

  • Sewing
  • Knitting
  • Quilting
  • Crochet
  • Home & Garden
  • Recycled Crafts
  • Scrapbooking
  • Card Making
  • Polymer Clay
  • Cross-Stitch
  • Edible Crafts
  • Felting
  • Glass Art
  • Indie Crafts
  • Kids Crafts
  • Jewelry Making
  • Lesson Plans
  • Needlework
  • Bath & Body
  • Party Ideas
  • Candle Making
  • DIY Weddings
  • Not Craft
  • Free Craft Projects

Copyright © 2025 · CraftGossip | Start Here | Contact Us | Link to Us | Your Editors | Privacy and affiliate policy