• Home
  • Suggest A DIY
  • DIY Newsletter

Cross-Stitch

Charts, patterns and everything needlepoint

  • About CraftGossip
  • Our Network
    • Bath & Body Crafts
    • Candle Making Ideas
    • Crochet Ideas
    • Cross Stitch
    • Edible Crafts
    • Felting Patterns
    • Glass Art
    • Home & Garden Ideas
    • Indie Crafts
    • Jewelry Making
    • Kids Crafts
    • Knitting Patterns
    • Lesson Plans
    • Needlework
    • Party Ideas
    • Polymer Clay
    • Quilting Ideas
    • Recycled Crafts
    • Scrapbooking
    • Sewing Patterns
    • Card Making
    • DIY Weddings
    • Not Craft Ideas
  • Giveaways
  • Roundups
  • Store
  • Search

Check Out This Great Method for Framing Cross Stitch

June 7, 2025 by Sarah White

When you put all the time and energy you do into making a great cross stitch project, it’s worth taking the time to frame it in a way that will make it look its best.

Often for smaller designs we’ll choose to frame projects in a hoop, which is cute and a fine option, especially for seasonal projects you might want to change out through the year. Others will send their finished projects for professional framing, which is a great option for gifts and heirloom items that need to be preserved, but it can also be quite expensive.

Crewel Ghoul has a great tutorial for a way that you can easily frame your cross stitch projects at home with just a few supplies.

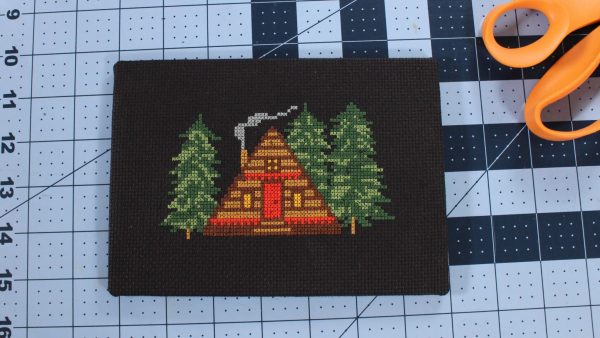
She uses adhesive mounting board (but you can use non-adhesive board if you have some one hand or you need a size that’s not available in an adhesive version) and a few other basic supplies to secure the sides and corners of the cross stitch fabric around the board before putting the design in the frame.

This requires a bit of hand sewing, but we’re cross stitchers so I’m sure we can handle that.

Framing your cross stitch like this gives it a little padding in the frame, which makes it look better than if it were just flat in a frame with no special finishing. It’s also a great idea to use a frame without glass or to leave the glass out of the frame so it doesn’t crush your stitches.

And though this is super secure it’s not 100 percent permanent if you decide you don’t want the project framed in that way any more. Or you can take it out of the frame and the edges are still all nicely finished so you can display it a different way without having to do anything else to it.

Check out the tutorial at Crewel Ghoul.

[Photo: Crewel Ghoul.]

Next Pattern:

  • To Ways to Back a Hoop to Frame Cross Stitch
«
»

Have you read?

Everything You Need to Know About Embroidery Hoops

One of the most common supplies for cross stitch, aside from fabric, needles and floss, is an embroidery hoop. A hoop isn’t needed for every project, and indeed there are some stitchers who prefer not to use them at all. I generally don’t use a hoop when I’m working on a small cross stitch project, especially something that’s shape isn’t conducive to using a hoop (like a bookmark). 

But embroidery hoops can be really helpful for cross stitch because they hold your fabric at an even tension, which allows you to stitch more evenly without any more work on your part. It’s great for beginners to use hoops because the tension on the fabric can both help make your stitches more even and make the holes in the fabric a little easier to see. 

I’ll admit to always just buying whatever hoop is available in the right size when I’m ready to start a project without giving it much more thought than that. But there are things you should consider when choosing among the different kinds of hoops, which Caterpillar Cross Stitch covers in their great guide to embroidery hoops. 

The post walks you through wooden, plastic, spring tension and flexi hoops (which I’ll admit to having never heard of; they’re made of vinyl and plastic apparently), as well as Q-Snap frames, which aren’t really hoops because they’re made of plastic tubes that you snap together in the size and shape you need. 

It also covers what size hoop you should use for the project you’re working on and how to actually use a hoop in the right way. 

Whether you’re new to cross stitch or more seasoned, you’re sure to pick up a tip or a product to try in this post, so go check it out over at Caterpillar Cross Stitch. 

Do you have a favorite kind of embroidery hoop to use for cross stitch, or do you go without? I’d love to hear your thoughts!

[Photo: Caterpillar Cross Stitch]

Categories

Book Reviews Christmas Craft Businesses Craft Inspirations Craft News and Events Cross-Stitch Patterns & Charts Cross-Stitch Product Reviews Cross-Stitch Website Reviews Dogs & Cats Easter flowers Free Patterns Halloween More Cross Stitch Product Reviews spring Subversive Thanksgiving Tutorials and Patterns valentines day

RSS More Articles

  • Everything You Need to Know About Embroidery Hoops
  • Needle Felting Fairy Tutorial by Santa Meada
  • Printable Stickers for Journals and Planners – Self Care
  • Stitch Your Favorite Fruit on a Sweater
  • 12 Color Wheel Inspired Scrapbook Layouts
  • Crafts With Old Bricks: Creative Ways To Upcycle Leftover Bricks
  • How To Make A Milk Mache Molding Compound
  • The 5 Outlet Placement Mistakes You Don’t Want to Make
  • Celebrate the Spirit of the Southwest with These Stunning Indian Navajo Tribal Quilt Patterns
  • Pricing Handmade Sewing Items Without Undervaluing Yourself

Pick Your Blog

  • Sewing
  • Knitting
  • Quilting
  • Crochet
  • Home & Garden
  • Recycled Crafts
  • Scrapbooking
  • Card Making
  • Polymer Clay
  • Cross-Stitch
  • Edible Crafts
  • Felting
  • Glass Art
  • Indie Crafts
  • Kids Crafts
  • Jewelry Making
  • Lesson Plans
  • Needlework
  • Bath & Body
  • Party Ideas
  • Candle Making
  • DIY Weddings
  • Not Craft
  • Free Craft Projects

Copyright © 2026 · CraftGossip | Start Here | Contact Us | Link to Us | Your Editors | Privacy and affiliate policy