• Home
  • Suggest A Craft
  • DIY Newsletter

Cross-Stitch

Charts, patterns and everything needlepoint

  • About CraftGossip
  • Our Network
    • Bath & Body Crafts
    • Candle Making Ideas
    • Crochet Ideas
    • Cross Stitch
    • Edible Crafts
    • Felting Patterns
    • Glass Art
    • Home & Garden Ideas
    • Indie Crafts
    • Jewelry Making
    • Kids Crafts
    • Knitting Patterns
    • Lesson Plans
    • Needlework
    • Party Ideas
    • Polymer Clay
    • Quilting Ideas
    • Recycled Crafts
    • Scrapbooking
    • Sewing Patterns
    • Card Making
    • DIY Weddings
    • Not Craft Ideas
  • Giveaways
  • Roundups
  • Store
  • Search

Converting Photos to Cross Stitch

August 29, 2024 by Sarah White

One of the questions I commonly hear from crafters, whether it’s related to cross stitch, knitting or crochet, is wondering how best to convert a photo or other image (like a logo) into a pattern that they can stitch.

I don’t have a very good answer because I haven’t done a lot of this kind of work, and the free online converters I’ve used have not been that great, meaning that I had to redraw my chart even when I was using a relatively simple design.

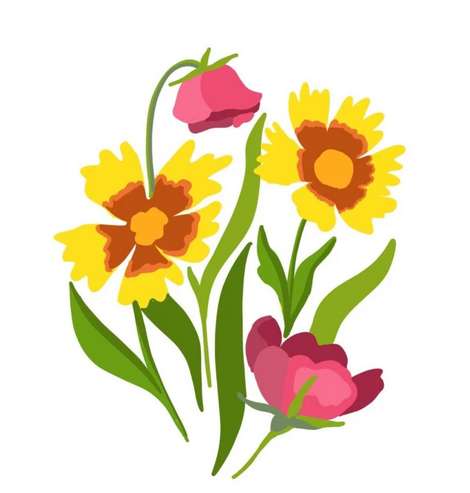
Crewel Ghoul decided to put a few pattern generators to the test and show off her results in a blog post. She wanted to look specifically at online or app pattern makers rather than programs you have to download and focused on Stitch Fiddle, Stitchly and Floss Cross.

She designed a floral image (which you can see above) and had each generator create a design of the same size and with the same maximum number of colors. Each one is rated on a scale of 1 to 3 for accuracy of color and design, ease of use and level of customization allowed, for a possible score of 12.

You’ll have to head over there to see all her designs and the rankings of the generators, but I will tell you that they all seemed to do pretty well and if you don’t need to make a lot of patterns or have a high level of customization (say you’re only making a pattern from a photo for personal use and don’t expect to need to do so regularly) you can develop a fine pattern with just free tools or the free version of tools.

That said, the more complex the pattern you’re trying to make in terms of size, number of colors, shadows, etc., the harder it is for any program to replicate. But it’s worth taking a look at these tools to see what they can do for you.

Head over to Crewel Ghoul to read the full review and take a look at the different versions of her pattern the generators made.

[Photo: Crewel Ghoul]

How to Cross Stitch a QR Code

An Easy Way to Make Your Own Cross Stitch Charts with Text

Next Pattern:

  • The Best Cross Stitch Pattern Generators
«
»

Have you read?

Check Out This Great Method for Framing Cross Stitch

When you put all the time and energy you do into making a great cross stitch project, it’s worth taking the time to frame it in a way that will make it look its best.

Often for smaller designs we’ll choose to frame projects in a hoop, which is cute and a fine option, especially for seasonal projects you might want to change out through the year. Others will send their finished projects for professional framing, which is a great option for gifts and heirloom items that need to be preserved, but it can also be quite expensive.

Crewel Ghoul has a great tutorial for a way that you can easily frame your cross stitch projects at home with just a few supplies.

She uses adhesive mounting board (but you can use non-adhesive board if you have some one hand or you need a size that’s not available in an adhesive version) and a few other basic supplies to secure the sides and corners of the cross stitch fabric around the board before putting the design in the frame.

This requires a bit of hand sewing, but we’re cross stitchers so I’m sure we can handle that.

Framing your cross stitch like this gives it a little padding in the frame, which makes it look better than if it were just flat in a frame with no special finishing. It’s also a great idea to use a frame without glass or to leave the glass out of the frame so it doesn’t crush your stitches.

And though this is super secure it’s not 100 percent permanent if you decide you don’t want the project framed in that way any more. Or you can take it out of the frame and the edges are still all nicely finished so you can display it a different way without having to do anything else to it.

Check out the tutorial at Crewel Ghoul.

[Photo: Crewel Ghoul.]

Categories

Book Reviews Christmas Craft Businesses Craft Inspirations Craft News and Events Cross-Stitch Patterns & Charts Cross-Stitch Product Reviews Cross-Stitch Website Reviews Dogs & Cats Easter flowers Free Patterns Halloween More Cross Stitch Product Reviews spring Subversive Thanksgiving Tutorials and Patterns valentines day

RSS More Articles

  • Learn about China for Kids
  • Check Out This Great Method for Framing Cross Stitch
  • Teddy Family – Free Crochet Patterns
  • Book Review – Americana Quilts
  • Add a Splash of Joy to Your Crafts with The Big Book of Happy Crafts
  • 5 FREE Die Cut Father’s Day Interactive Cards
  • DIY Purse with Cricut Maker: A Fun and Easy Sewing Project
  • Free Pattern – Queen Anne’s Lace Meadow
  • FREE Sun and Waves Die Cut File Download
  • A Blanket Knitting Pattern Where Yarn Selection is Everything

Pick Your Blog

  • Sewing
  • Knitting
  • Quilting
  • Crochet
  • Home & Garden
  • Recycled Crafts
  • Scrapbooking
  • Card Making
  • Polymer Clay
  • Cross-Stitch
  • Edible Crafts
  • Felting
  • Glass Art
  • Indie Crafts
  • Kids Crafts
  • Jewelry Making
  • Lesson Plans
  • Needlework
  • Bath & Body
  • Party Ideas
  • Candle Making
  • DIY Weddings
  • Not Craft
  • Free Craft Projects

Copyright © 2025 · CraftGossip | Start Here | Contact Us | Link to Us | Your Editors | Privacy and affiliate policy