• Home
  • Suggest A Craft
  • DIY Newsletter

Cross-Stitch

Charts, patterns and everything needlepoint

  • About CraftGossip
  • Our Network
    • Bath & Body Crafts
    • Candle Making Ideas
    • Crochet Ideas
    • Cross Stitch
    • Edible Crafts
    • Felting Patterns
    • Glass Art
    • Home & Garden Ideas
    • Indie Crafts
    • Jewelry Making
    • Kids Crafts
    • Knitting Patterns
    • Lesson Plans
    • Needlework
    • Party Ideas
    • Polymer Clay
    • Quilting Ideas
    • Recycled Crafts
    • Scrapbooking
    • Sewing Patterns
    • Card Making
    • DIY Weddings
    • Not Craft Ideas
  • Giveaways
  • Roundups
  • Store
  • Search

Designer Spotlight: Teeny Weeny XStitch

January 18, 2024 by Sarah White

I have mentioned recently that I want to take on a large cross-stitch project this year, but the truth is most of the time I am drawn to projects on the other side of the size spectrum.

Tiny things are cute, and they’re quicker to make, so you can make more of them. Minis can be stitched up sampler style, added to bookmarks, made into pins or used in all sorts of other ways.

If you’re a fan of wee stitching, let me introduce you to Teeny Weeny XStitch on Etsy.

Designer Lior Zochovizky offers collections of little projects including seasonal designs, geeky stuff, sea animals, Greek gods and goddesses and more.

There are dinosaurs doing Christmas stuff. Animals in space. Seashells, science symbols and creepy cryptids.

You can also buy many of the patterns not as bundles, but if you’re getting one little design, why not get a bunch? There are also options for bundles than include 60+ patterns, and you can buy the whole shop in one bundle if you like minis even more than I do or just really want to support this designer.

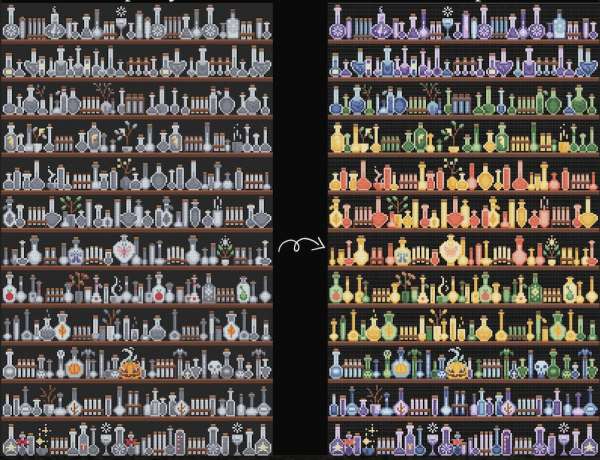
One project of theirs I really wanted to point out is the magic potions temperature stitchalong. This project includes different styles of bottles lined up on shelves, and you can change up the style as you like and make the color of the potion the temperature it was each day where you live. (If you’re reading this around the time I posted it you still have time to catch up of the year! And of course these are minis so the whole year shouldn’t take that long, or you can do it for a special year in the past like when you got married or a child was born, etc.)

The full design is 180 by 300 stitches, which comes out to 12.9 by 31.4 inches, or 32.7 by 54.4 cm, on 14-count fabric (use 16 or 18 to make it smaller if you want). The number of colors varies depending on how granular you want to get and the range of temps where you live, but it can be up to 44 colors.

[Photo: Teeny Weeny XStitch]

Next Pattern:

  • 30 Bookmarks To Cross Stitch For Kids
«
»

Have you read?

Check Out This Great Method for Framing Cross Stitch

When you put all the time and energy you do into making a great cross stitch project, it’s worth taking the time to frame it in a way that will make it look its best.

Often for smaller designs we’ll choose to frame projects in a hoop, which is cute and a fine option, especially for seasonal projects you might want to change out through the year. Others will send their finished projects for professional framing, which is a great option for gifts and heirloom items that need to be preserved, but it can also be quite expensive.

Crewel Ghoul has a great tutorial for a way that you can easily frame your cross stitch projects at home with just a few supplies.

She uses adhesive mounting board (but you can use non-adhesive board if you have some one hand or you need a size that’s not available in an adhesive version) and a few other basic supplies to secure the sides and corners of the cross stitch fabric around the board before putting the design in the frame.

This requires a bit of hand sewing, but we’re cross stitchers so I’m sure we can handle that.

Framing your cross stitch like this gives it a little padding in the frame, which makes it look better than if it were just flat in a frame with no special finishing. It’s also a great idea to use a frame without glass or to leave the glass out of the frame so it doesn’t crush your stitches.

And though this is super secure it’s not 100 percent permanent if you decide you don’t want the project framed in that way any more. Or you can take it out of the frame and the edges are still all nicely finished so you can display it a different way without having to do anything else to it.

Check out the tutorial at Crewel Ghoul.

[Photo: Crewel Ghoul.]

Categories

Book Reviews Christmas Craft Businesses Craft Inspirations Craft News and Events Cross-Stitch Patterns & Charts Cross-Stitch Product Reviews Cross-Stitch Website Reviews Dogs & Cats Easter flowers Free Patterns Halloween More Cross Stitch Product Reviews spring Subversive Thanksgiving Tutorials and Patterns valentines day

RSS More Articles

  • Learn about China for Kids
  • Check Out This Great Method for Framing Cross Stitch
  • Teddy Family – Free Crochet Patterns
  • Book Review – Americana Quilts
  • Add a Splash of Joy to Your Crafts with The Big Book of Happy Crafts
  • 5 FREE Die Cut Father’s Day Interactive Cards
  • DIY Purse with Cricut Maker: A Fun and Easy Sewing Project
  • Free Pattern – Queen Anne’s Lace Meadow
  • FREE Sun and Waves Die Cut File Download
  • A Blanket Knitting Pattern Where Yarn Selection is Everything

Pick Your Blog

  • Sewing
  • Knitting
  • Quilting
  • Crochet
  • Home & Garden
  • Recycled Crafts
  • Scrapbooking
  • Card Making
  • Polymer Clay
  • Cross-Stitch
  • Edible Crafts
  • Felting
  • Glass Art
  • Indie Crafts
  • Kids Crafts
  • Jewelry Making
  • Lesson Plans
  • Needlework
  • Bath & Body
  • Party Ideas
  • Candle Making
  • DIY Weddings
  • Not Craft
  • Free Craft Projects

Copyright © 2025 · CraftGossip | Start Here | Contact Us | Link to Us | Your Editors | Privacy and affiliate policy