“Railroad” doesn’t really sound like a term that should have anything to do with cross stitch, but it is a useful technique if you want to give your work a really crisp, uniform look.
Railroading, a stitching technique that aligns two floss strands side by side, is a secret weapon in the cross-stitching community. By reducing twisting and knots, this technique offers flatter stitches, even coverage, and is particularly beneficial when working with metallic threads. In this comprehensive guide, we’ll explore the intricacies of railroading, its advantages, and how to master this technique like a seasoned stitcher. Let’s embark on this stitch-tacular journey together!
I don’t know where the word came from or why this technique is called railroading, but here we are. (Lord Libidan says its because the threads look like rails sitting next to each other, similar to the way they look in American railroad crossings, so do with that what you will.) It’s a method for forcing the threads of your stitches to lie flat.
One of the primary advantages of railroading is the creation of flatter stitches. When two floss strands are neatly aligned, they lie parallel to each other, reducing bulk and preventing the threads from twisting around each other. This results in a more even tension and a smoother surface, enhancing the overall visual appeal of your cross-stitch project.
This is easiest to do when you are stitching with two threads at a time, but you can do it with more using a tool.
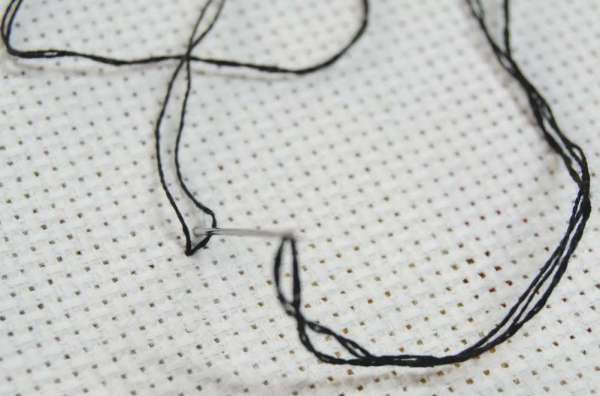
The most basic way to railroad a stitch is by taking your needle between the two threads when you form the stitch. This separates them and allows them to lie flatter than if you stitch with the both together.
Of course you can’t do that with more than two threads, so the other option is to use a tool, which can be a purchased tool called a laying tool or thread controller, or you can use a wooden skewer, a chopstick, a knitting needle, etc. As you make the stitch you flatten the threads with the tool, make the stitch around the tool so the threads stay flat, then remove the tool and tighten up the stitch.
You can see these methods in action at Catkin and Lille and Sirious Stitches.
Why would you want to railroad your cross stitch? It does make the finished project look a little neater, and if you have thread that twists a lot as you stitch this will prevent those twists from being present in your stitching. Some people say that railroading gives better coverage so you can’t see as much of the fabric below the stitch, but you might want to test this yourself.
When it comes to stitching between the threads, this doesn’t really take any more time to stitch than your standard method (especially considering most people only railroad the top leg of the stitch, not both). If you are using a tool, especially with more than two threads, it will slow your stitching time down considerably and might not be worth the difference in the results.
Metallic threads can add a touch of elegance and shimmer to your cross-stitch masterpiece. However, they are notorious for their unruly nature, often tangling and causing frustration for stitchers. This is where railroading comes to the rescue! By utilizing this technique, you can tame metallic threads and enjoy a hassle-free stitching experience. The parallel alignment created by railroading minimizes the chances of snagging and tangling, allowing you to work with metallic threads confidently.
Here again it would be great to test it and see if you prefer the look of railroaded stitches enough to justify the extra time it takes.
Have you ever used this technique? I’d love to hear about it!
[Photo: Sirious Stitches.]
How to Railroad Stitch
Step 1: Prepare Your Threads
Before you begin stitching, it’s crucial to prepare your threads for railroading. Start by separating the floss strands, ensuring they remain tangle-free. To railroad, you will work with two strands side by side, so take your time to align them neatly.
Step 2: Positioning and Stitching
To achieve optimal results, focus on the top arm of the stitch while railroading. When inserting your needle through the fabric, ensure that both strands lie parallel to each other. As you pull the needle through, gently maintain the alignment, guiding the needle between the strands.
Step 3: Practice and Refinement
Like any skill, mastering railroading requires practice. Begin by experimenting on a spare piece of fabric before applying the technique to your main project. With time, your confidence will grow, and railroading will become second nature. Remember to take breaks when needed and enjoy the journey of honing your stitching abilities.
Storing Embroidery Threads – Are you tired of tangled embroidery threads and the frustration they bring to your stitching projects? Look no further! In this comprehensive guide, we’ll explore the art of storing embroidery threads. Discover practical tips, creative storage solutions, and innovative ideas to keep your threads organized and readily accessible. Say goodbye to messy tangles and hello to a well-organized thread collection that will inspire your next stitching masterpiece.
Different Kinds of Cross Stitch Thread and What to Use Them for – The world of cross stitch thread is vast and diverse, offering a myriad of options to bring your needlework to life. But with so many choices available, how do you know which thread is best suited for your project? In this informative guide, we’ll delve into the different kinds of cross stitch thread, from cotton and silk to metallic and variegated. Discover the unique characteristics and recommended applications for each type, empowering you to make informed decisions and create stunning cross stitch creations.
10 Tips for Stitching with Glow in the Dark Thread – Are you ready to add a touch of enchantment to your cross stitch projects? Glow in the dark thread is here to light up your stitching journey! In this illuminating guide, we’ll share ten invaluable tips for stitching with glow in the dark thread. From choosing the right fabric to optimizing your stitching techniques, we’ll empower you to achieve captivating results that come to life when the lights go out. Get ready to infuse your needlework with a magical glow!
Tips for Stitching with Silk Thread – Silk thread brings a luxurious touch to your cross stitch projects, but it also requires special care and attention. If you’re eager to explore the world of silk thread stitching or looking for ways to enhance your existing skills, you’ve come to the right place! In this insightful guide, we’ll provide you with valuable tips for stitching with silk thread. From proper handling and preventing tangling to achieving impeccable results, we’ll equip you with the knowledge you need to master the art of silk thread embroidery.
Cross Stitch Tip: How to Blend Colors of Floss – Creating harmonious color blends in cross stitch projects adds depth and dimension to your artwork. But how do you achieve seamless transitions between different shades of floss? In this enlightening guide, we’ll unveil a valuable cross stitch tip: how to blend colors of floss. Discover step-by-step techniques, practical advice, and creative ideas that will enable you to expertly combine colors and create stunning gradients in your cross stitch designs. Unlock your artistic potential and take your stitching to a whole new level!


