• Home
  • Suggest A DIY
  • DIY Newsletter

Cross-Stitch

Charts, patterns and everything needlepoint

  • About CraftGossip
  • Our Network
    • Bath & Body Crafts
    • Candle Making Ideas
    • Crochet Ideas
    • Cross Stitch
    • Edible Crafts
    • Felting Patterns
    • Glass Art
    • Home & Garden Ideas
    • Indie Crafts
    • Jewelry Making
    • Kids Crafts
    • Knitting Patterns
    • Lesson Plans
    • Needlework
    • Party Ideas
    • Polymer Clay
    • Quilting Ideas
    • Recycled Crafts
    • Scrapbooking
    • Sewing Patterns
    • Card Making
    • DIY Weddings
    • Not Craft Ideas
  • Giveaways
  • Roundups
  • Store
  • Search

How to Turn a Photo or Drawing into a Cross-Stitch Pattern

February 6, 2024 by Sarah White

One of the most common questions I see online when it comes to designing patterns is how to turn a photo or drawing into a cross stitch pattern. It’s not actually that difficult, especially if the project isn’t too detailed, but there are also some ways to make it easier.

If you want to draw it out yourself by hand, these instructions from WikiHow cover the basics. You’ll need a light box (or a window) to help you trace the general outlines of your design and sketch in any details. You’ll also need gridded paper of the same count that you plan to use for your design (this helps get the scale right), which you can find here.

Once you have the general outline you’ll have to decide if you want to use partial stitches to follow the exact outlines of shapes or shift the design a little to keep with whole stitches. You can also pick your colors and choose to color in the chart or use different symbols to indicate the different colors (or both!).

If you don’t want to have to draw your cross stitch pattern out completely on your own, you can use a program like StitchFiddle to do it for you. With StitchFiddle you can choose your craft (knitting, crochet, cross stitch and more) and the brand of floss you use, then upload a photo or start with a blank chart to make your own design. You can even make QR codes to stitch.

You can alter the number of colors, the fabric count and the size and it will adjust your chart accordingly. (I don’t think you can save without an account, but it’s fun to play with to see what your chart will look like before you subscribe.)

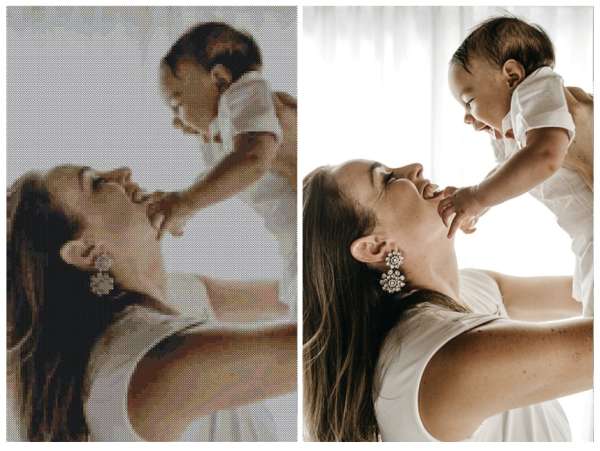
Another option is to have someone else make the chart for you. This is a service that DMC offers on its website. You just upload your photo and indicate what size fabric you want to use. Then you’ll either pay for the chart itself, or they will send you the chart for free if you buy all the thread for the project at the same time.

Have you ever made a cross stitch chart from a photo or drawing? I’d love to hear your tips!

[Photo: DMC]

Next Pattern:

  • Printable Cross Stitch Graph Paper
«
»

Have you read?

Cross Stitch Cards for All Occasions

I have never stitched a greeting card, but I kind of like the idea of it. It’s a card and a gift all in one, and hopefully one the recipient will hang onto for years to come. 

This collection of easy and colorful greeting card cross stitch patterns from Susan Bates (via Gathered) are a great place to start if you want to stitch your own greeting cards. 

These text-based designs cover a lot of card-sending events, such as:

  • get well soon
  • happy birthday
  • thank you
  • thinking of you
  • congratulations
  • anniversary
  • new home
  • good luck

The lettering is done in gradients and there are other details like hearts and stars, a house key and a gift, depending on the text. There are full cross stitches and back stitch on all of the cards, and they use 15 colors for the cross stitching and six for the back stitching (and just two colors are used for both, so it’s 19 colors total). 

The designs vary a bit in size but the biggest one is 52 by 67 stitches, which comes out to 3.75 by 4.75 inches or 9.5 by 12 cm when worked on 14 count fabric or 28 count evenweave. The text suggests beads are also used in the patterns but there’s no note of them in the key, so go wild and add some beads if you like. 

Designs are worked on a price of 6 by 8 inch/15 by 20 cm fabric and then mounted to a card with a colorful baking piece of card stock behind it. This is easy to assemble with whatever cardstock greeting cards you have on hand.

You can get the free charts as a PDF from Gathered. 

Have you ever stitched your own greeting cards? I’d love to hear about it, or let me know if these inspire you to try. 

[Photo: Susan Bates via Gathered]


Categories

Book Reviews Christmas Craft Businesses Craft Inspirations Craft News and Events Cross-Stitch Patterns & Charts Cross-Stitch Product Reviews Cross-Stitch Website Reviews Dogs & Cats Easter flowers Free Patterns Halloween More Cross Stitch Product Reviews spring Subversive Thanksgiving Tutorials and Patterns valentines day

RSS More Articles

  • Cross Stitch Cards for All Occasions
  • Free Oven Mitt Sewing Pattern: A Fat Quarter Friendly Kitchen Gift You’ll Actually Use
  • What Does PSSO Mean In Knitting? How To Pass A Slipped Stitch Over
  • Sophie Hood Pattern Free: Knit And Crochet Hooded Scarf Patterns For The Viral Winter Look
  • Coca-Cola Foot Soak Recipe: The Viral Fizzy Foot Hack For Tired, Rough Feet
  • 3 FREE Dark Romantasy Coloring Pages
  • Needle Felted Tropical Hibiscus Flower Tutorial
  • 12 Masculine Scrapbook Layouts for Men
  • Book Review: The No-Brainer Brain Explainer
  • Knit and Felt Some Tabi Style Slippers

Pick Your Blog

  • Sewing
  • Knitting
  • Quilting
  • Crochet
  • Home & Garden
  • Recycled Crafts
  • Scrapbooking
  • Card Making
  • Polymer Clay
  • Cross-Stitch
  • Edible Crafts
  • Felting
  • Glass Art
  • Indie Crafts
  • Kids Crafts
  • Jewelry Making
  • Lesson Plans
  • Needlework
  • Bath & Body
  • Party Ideas
  • Candle Making
  • DIY Weddings
  • Not Craft
  • Free Craft Projects

Copyright © 2026 · CraftGossip | Start Here | Contact Us | Link to Us | Your Editors | Privacy and affiliate policy