• Home
  • Suggest A DIY
  • DIY Newsletter

Cross-Stitch

Charts, patterns and everything needlepoint

  • About CraftGossip
  • Our Network
    • Bath & Body Crafts
    • Candle Making Ideas
    • Crochet Ideas
    • Cross Stitch
    • Edible Crafts
    • Felting Patterns
    • Glass Art
    • Home & Garden Ideas
    • Indie Crafts
    • Jewelry Making
    • Kids Crafts
    • Knitting Patterns
    • Lesson Plans
    • Needlework
    • Party Ideas
    • Polymer Clay
    • Quilting Ideas
    • Recycled Crafts
    • Scrapbooking
    • Sewing Patterns
    • Card Making
    • DIY Weddings
    • Not Craft Ideas
  • Giveaways
  • Roundups
  • Store
  • Search

How to Wash and Iron Your Cross Stitch Projects

February 20, 2024 by Sarah White

When you’re just making a small cross stitch project such as a bookmark, or something that is going to be displayed in a hoop, you don’t necessarily have to give a lot of thought to finishing it by washing or ironing the project.

Of course if you get it dirty, which can totally happen just from the oil on your hands or if you’re eating (or have pets) around your project, you’ll want to wash it no matter the size. But larger projects that are going to be framed in particular benefit from a little extra attention before you declare them finished.

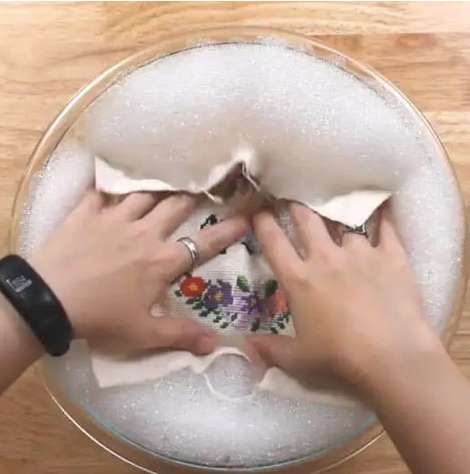
Notorious Needle has good tips on how to wash your cross stitch, and, if you need to, how to iron it.

It’s actually not that different from how you might wash and block a knitting or crochet project, and it’s really important to do with those big projects even if it doesn’t look like you got grime on it. That’s because the oils from our hands and the skin cells that get on the project while we stitch can discolor the fabric and even deteriorate the fibers in the fabric or the floss.

Washing is also essential if you used any water-soluable ink pens on your project, or if the design was stamped on the cross stitch fabric before you started.

Once you’ve gotten it all clean, if you still find that there are creases where your hoop was holding the project, you can also iron it.

The key with both of these steps is to treat your project with care: use lukewarm water and gentle, clear soap, don’t wring it out aggressively, don’t put a hot iron directly onto your project.

These few steps might seem like a pain when you just want to be done, but they’ll take your project from done to finished and make sure it looks as good as all the work you put into it.

Click the links about to get all the details on how to finish your projects the best possible way.

[Photo: Notorious Needle]

Next Pattern:

  • Finish Your Cross Stitch with Washing and Pressing
«
»

Have you read?

Everything You Need to Know About Embroidery Hoops

One of the most common supplies for cross stitch, aside from fabric, needles and floss, is an embroidery hoop. A hoop isn’t needed for every project, and indeed there are some stitchers who prefer not to use them at all. I generally don’t use a hoop when I’m working on a small cross stitch project, especially something that’s shape isn’t conducive to using a hoop (like a bookmark). 

But embroidery hoops can be really helpful for cross stitch because they hold your fabric at an even tension, which allows you to stitch more evenly without any more work on your part. It’s great for beginners to use hoops because the tension on the fabric can both help make your stitches more even and make the holes in the fabric a little easier to see. 

I’ll admit to always just buying whatever hoop is available in the right size when I’m ready to start a project without giving it much more thought than that. But there are things you should consider when choosing among the different kinds of hoops, which Caterpillar Cross Stitch covers in their great guide to embroidery hoops. 

The post walks you through wooden, plastic, spring tension and flexi hoops (which I’ll admit to having never heard of; they’re made of vinyl and plastic apparently), as well as Q-Snap frames, which aren’t really hoops because they’re made of plastic tubes that you snap together in the size and shape you need. 

It also covers what size hoop you should use for the project you’re working on and how to actually use a hoop in the right way. 

Whether you’re new to cross stitch or more seasoned, you’re sure to pick up a tip or a product to try in this post, so go check it out over at Caterpillar Cross Stitch. 

Do you have a favorite kind of embroidery hoop to use for cross stitch, or do you go without? I’d love to hear your thoughts!

[Photo: Caterpillar Cross Stitch]

Categories

Book Reviews Christmas Craft Businesses Craft Inspirations Craft News and Events Cross-Stitch Patterns & Charts Cross-Stitch Product Reviews Cross-Stitch Website Reviews Dogs & Cats Easter flowers Free Patterns Halloween More Cross Stitch Product Reviews spring Subversive Thanksgiving Tutorials and Patterns valentines day

RSS More Articles

  • Everything You Need to Know About Embroidery Hoops
  • Needle Felting Fairy Tutorial by Santa Meada
  • Printable Stickers for Journals and Planners – Self Care
  • Stitch Your Favorite Fruit on a Sweater
  • 12 Color Wheel Inspired Scrapbook Layouts
  • Crafts With Old Bricks: Creative Ways To Upcycle Leftover Bricks
  • How To Make A Milk Mache Molding Compound
  • The 5 Outlet Placement Mistakes You Don’t Want to Make
  • Celebrate the Spirit of the Southwest with These Stunning Indian Navajo Tribal Quilt Patterns
  • Pricing Handmade Sewing Items Without Undervaluing Yourself

Pick Your Blog

  • Sewing
  • Knitting
  • Quilting
  • Crochet
  • Home & Garden
  • Recycled Crafts
  • Scrapbooking
  • Card Making
  • Polymer Clay
  • Cross-Stitch
  • Edible Crafts
  • Felting
  • Glass Art
  • Indie Crafts
  • Kids Crafts
  • Jewelry Making
  • Lesson Plans
  • Needlework
  • Bath & Body
  • Party Ideas
  • Candle Making
  • DIY Weddings
  • Not Craft
  • Free Craft Projects

Copyright © 2026 · CraftGossip | Start Here | Contact Us | Link to Us | Your Editors | Privacy and affiliate policy