• Home
  • Suggest A DIY
  • DIY Newsletter

Cross-Stitch

Charts, patterns and everything needlepoint

  • About CraftGossip
  • Our Network
    • Bath & Body Crafts
    • Candle Making Ideas
    • Crochet Ideas
    • Cross Stitch
    • Edible Crafts
    • Felting Patterns
    • Glass Art
    • Home & Garden Ideas
    • Indie Crafts
    • Jewelry Making
    • Kids Crafts
    • Knitting Patterns
    • Lesson Plans
    • Needlework
    • Party Ideas
    • Polymer Clay
    • Quilting Ideas
    • Recycled Crafts
    • Scrapbooking
    • Sewing Patterns
    • Card Making
    • DIY Weddings
    • Not Craft Ideas
  • Giveaways
  • Roundups
  • Store
  • Search

Make Your Hoops Prettier to Use as Frames

January 17, 2025 by Sarah White

It’s popular to use embroidery hoops as frames for cross stitch projects, but a plain wooden hoop isn’t really that interesting as a way to present your hard work to the world.

Luckily it’s pretty easy to embellish an embroidery hoop to make it a little prettier to use as a frame.

Bobo Stitch has a couple of tutorials that will inspire you to make your hoops a little better.

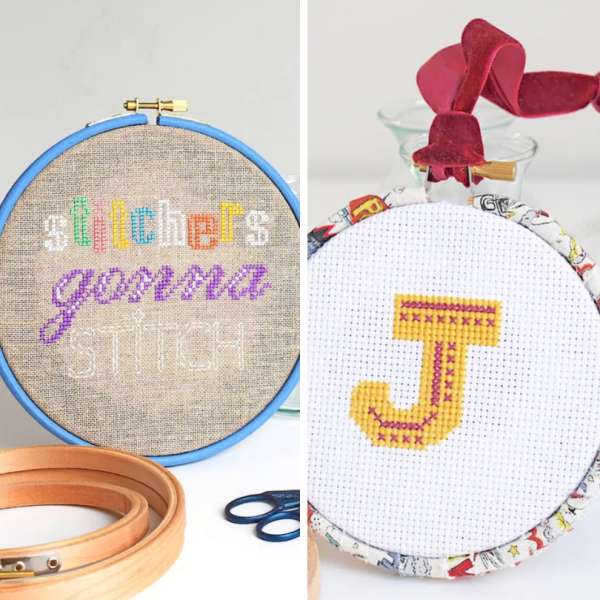
First, you can paint your hoop to use it as a frame. I’ve done this before to make a wall storage pocket, which I guess I never blogged about, but you can find similar at East Coast Creative.

They say you should only do this for display purposes and not for a hoop that you plan to use for stitching because there’s a chance the paint could rub off on your project, which is probably a risk for finishbobostitch.co.uk/…/how-to-paint-an-embroidery-hooped projects, too, so you might not want to use this method on heirloom type projects or anything you might want to frame in a different size/shape of frame later on just in case.

You can also wrap your embroidery hoop in fabric, which is really cute and a fun way to reinforce the theme or colors of your project if you have fabric to match. This one only uses glue to attach the fabric to the hoop, but you might also want to use a bit of fabric Mod Podge on the fabric once it’s in place to keep it from fraying.

This one made me think maybe you could also decorate a hoop with washi tape, which would be more removable if you wanted to change the look.

Either way, if you want to make your embroidery hoop frames a little prettier, these are some great ideas. Have you ever used paint, fabric or something else to decorate a hoop? I’d love to hear about it.

[Photo: Bobo Stitch]

Next Pattern:

  • Cross Stitching on Wooden Blanks
«
»

Have you read?

How to Travel with Cross Stitch

Cross stitch is not a craft I generally travel with (since I’m not that good at it, I prefer not to be moving while I’m doing it) but I’m sure there are lots of stitchers who would like to take their projects with them when they travel. 

Koekoek has a post all about cross stitching on a plane, which is a great plan since it’s lots of uninterrupted time to work. As mentioned in the post, you should be able to bring embroidery needles (which tend not to be that sharp anyway) on an airplane with you. 

Regulations in the United States say that scissors with blades up to 4 inches/10 cm are allowed in the cabin, but whether they are allowed by security as you pass through it is up to their discretion. And thread cutters that use a razor blade are not supposed to be allowed at any time. 

Alternatives include bringing nail clippers to snip your threads, or pre-cutting thread and placing it on bobbins so you can stitch on the plane. Then pack scissors in your checked bag so you can cut any loose ends or extra long strands later. 

Check out the post at Koekoek for more tips on traveling with cross stitch and suggestions for projects to pack when traveling. I’ve also written in the past about this post from Caterpillar Cross Stitch about traveling with cross stitch supplies and, importantly, what to do to make your screening as smooth as possible. And, importantly, what to do if the security agents question your supplies or want to confiscate anything you brought. 

And that’s a great tip, too: if you are packing scissors in your carry on but you’re also checking a bag, pack extras there just in case. 

Do you have any tips for traveling with cross stitch projects? I’d love to hear them. Also check out my post about planning a travel stitching kit. 

Categories

Book Reviews Christmas Craft Businesses Craft Inspirations Craft News and Events Cross-Stitch Patterns & Charts Cross-Stitch Product Reviews Cross-Stitch Website Reviews Dogs & Cats Easter flowers Free Patterns Halloween More Cross Stitch Product Reviews spring Subversive Thanksgiving Tutorials and Patterns valentines day

RSS More Articles

  • FREE Die Cut Hummingbird Shaker Card
  • Book Review: Better Homes and Gardens Flea Market Decorating
  • DIY Backyard Water Play Ideas To Keep Kids Cool All Summer
  • Book Review Wednesday: The Complete Guide to Trinket Dishes for Beginners
  • How to Embroider on Canvas Shoes for a Custom Look
  • 12 Unique Borders for Scrapbook Layouts
  • Book Review: Wild Your World
  • Knit a Stunning Bestiary Scarf
  • Quick Quilting Projects for the 4th of July
  • Samplers to Cross Stitch for the Fourth of July

Pick Your Blog

  • Sewing
  • Knitting
  • Quilting
  • Crochet
  • Home & Garden
  • Recycled Crafts
  • Scrapbooking
  • Card Making
  • Polymer Clay
  • Cross-Stitch
  • Edible Crafts
  • Felting
  • Glass Art
  • Indie Crafts
  • Kids Crafts
  • Jewelry Making
  • Lesson Plans
  • Needlework
  • Bath & Body
  • Party Ideas
  • Candle Making
  • DIY Weddings
  • Not Craft
  • Free Craft Projects

Copyright © 2026 · CraftGossip | Start Here | Contact Us | Link to Us | Your Editors | Privacy and affiliate policy