• Home
  • Suggest A DIY
  • DIY Newsletter

Cross-Stitch

Charts, patterns and everything needlepoint

  • About CraftGossip
  • Our Network
    • Bath & Body Crafts
    • Candle Making Ideas
    • Crochet Ideas
    • Cross Stitch
    • Edible Crafts
    • Felting Patterns
    • Glass Art
    • Home & Garden Ideas
    • Indie Crafts
    • Jewelry Making
    • Kids Crafts
    • Knitting Patterns
    • Lesson Plans
    • Needlework
    • Party Ideas
    • Polymer Clay
    • Quilting Ideas
    • Recycled Crafts
    • Scrapbooking
    • Sewing Patterns
    • Card Making
    • DIY Weddings
    • Not Craft Ideas
  • Giveaways
  • Roundups
  • Store
  • Search

Stitch Historic Samplers from Fox and Rabbit Designs

July 15, 2023 by Sarah White

I came across Fox and Rabbit Designs recently, and while they have a variety of cross-stitch designs to choose from, what most interested me when looking through their website is the patterns that are reproductions of sampler patterns first stitched hundreds of years ago.

For example, there’s the Botany Bay sampler, shown here, which was probably originally stitched by 10-year-old Margret Begbie in the late 1700s or early 1800s in Scotland. (Botany Bay was the original name for the Australian colony used in the UK.) It features ships, buildings and other symbols of the colony, and comes with an interesting backstory, too.

A woman named Margaret Begbie was sentenced to transportation to Tasmania in 1845, so it’s possible that’s the same woman who stitched about this far-off land and ultimately ended up going there herself.

There’s also Dorothy’s sampler, a Dutch design from 1792 covered with birds and flowers. The original stitcher is unknown. Or Elizabeth Cooper’s 1866 pattern that includes an alphabet and numbers, butterflies, birds, flowers, a greyhound dog, and a religious verse.

These projects are all so cool and it’s really interesting just to look at them, but it would also be fun to stitch them to allow their history and stories to continue. Check out all the reproduction samplers here.

Fox and Rabbit designs is an Australian company that produces cross-stitch charts and hand-painted linen. They have a Patreon where you can get more patterns, or you can buy individual patterns from their website. Many of them have the classic look of old samplers (they call them antique-inspired, which sounds a little nicer than old) but there are some with a more modern design as well.

If you want to learn more about them and see what’s on offer on Patreon, check out their Instagram page.
 

«
»

Have you read?

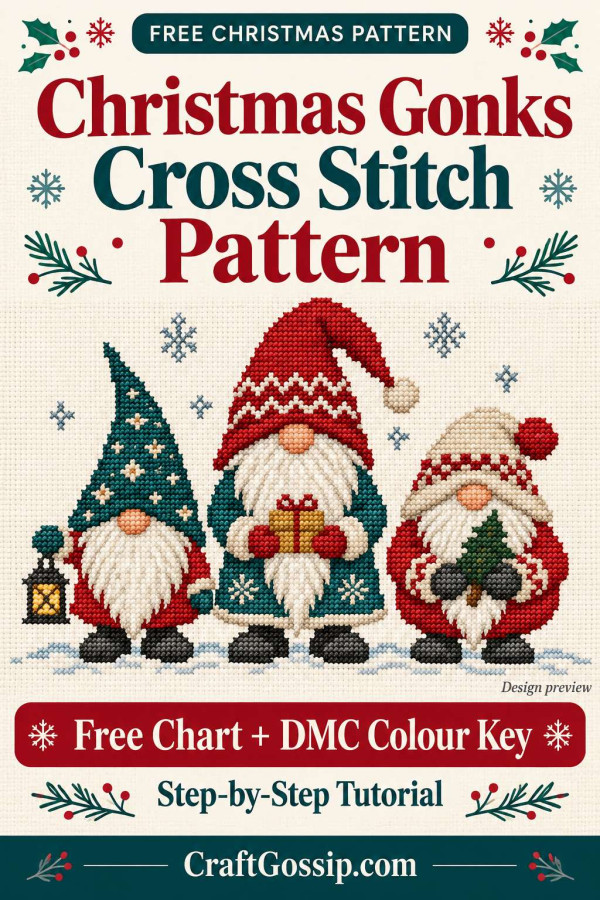
Free Christmas Gonk Cross Stitch Pattern With DMC Colour Key and Tutorial

There’s something rather irresistible about a Christmas gonk. The oversized hat, the little nose, the beard doing most of the work. They manage to look festive without needing so much as a facial expression.

This free Christmas gonk cross stitch pattern brings three of those cheerful characters together in cranberry red, deep teal and cream. One carries a lantern, another holds a present, and the third has brought along a little Christmas tree. They would make a lovely framed decoration for a hallway, a handmade gift for a gnome-loving friend, or the centre panel of a Christmas cushion.

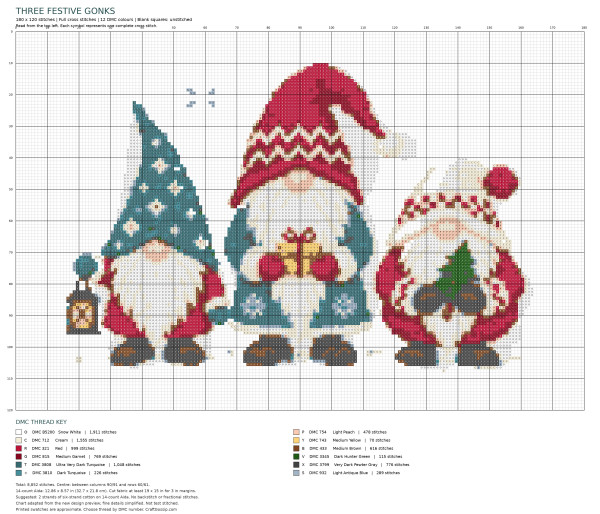
The downloadable chart includes a counted grid, individual colour symbols and a DMC thread key. Below, you’ll find the materials, fabric measurements and instructions for working the design.

Pattern note: This chart was digitally adapted from the accompanying design preview. Fine details have been simplified into full cross stitches, and the pattern has not been test stitched. Follow the counted chart rather than trying to reproduce every detail in the decorative preview.

Download the Free Christmas Gonk Cross Stitch Chart

Download the Christmas gonk counted cross stitch chart with DMC colour key. Right Click and Save the image below

Save the full-resolution PNG before printing or opening it on a tablet. The download contains the complete chart and thread key.

Each marked square represents one full cross stitch. Empty squares remain unstitched, allowing your fabric to form the background.

For more festive characters to add to your stitching basket, browse our Christmas gnome cross stitch patterns.

Christmas Gonk Pattern Details

DetailSpecification
Chart grid180 stitches wide × 120 stitches high
Total cross stitches8,852
Thread colours12 DMC shades
Stitch typeFull cross stitches
BackstitchNone required
Fractional stitchesNone required
Suggested fabric14-count Aida
Suggested thread coverageTwo strands
Suggested needleSize 24 tapestry needle
Skill levelConfident beginner or intermediate

The design uses straightforward stitches, but there are small colour changes in the hats, beards and accessories. Think of it as a project to enjoy over several stitching sessions, rather than a last-minute evening make.

How Big Will It Be?

These measurements cover the complete chart grid, including its unstitched outer space. The stitched characters occupy a smaller area within that grid.

Aida countFull chart area
14-count12.86 × 8.57 inches, approximately 32.7 × 21.8 cm
16-count11.25 × 7.5 inches, approximately 28.6 × 19.1 cm
18-count10 × 6.67 inches, approximately 25.4 × 16.9 cm

For 14-count Aida, cut a piece at least 19 × 15 inches, approximately 48.3 × 38.1 cm. This provides at least three inches beyond the chart area on each side for handling and finishing.

If you already have a particular frame in mind, check its mounting requirements before cutting.

Materials

  • The downloaded Christmas gonk chart
  • 14-count Aida, at least 19 × 15 inches
  • DMC six-strand embroidery cotton in the colours listed below
  • Size 24 blunt tapestry needle
  • Embroidery hoop or suitable stitching frame
  • Small embroidery scissors
  • Thread bobbins or labelled thread organisers
  • A clean towel and pressing cloth for finishing
  • Optional removable gridding thread
  • Optional acid-free mounting board and a frame

Choose ivory, oatmeal or another light neutral fabric with enough contrast for the white beards. Very bright white fabric will give a subtler outline around the pale stitches.

You can find DMC embroidery threads and stitching supplies when gathering materials. Label your bobbins with both the DMC number and chart symbol before you start. Two similar-looking reds become surprisingly easy to confuse once their paper bands have disappeared into the craft-room wilderness.

DMC Colour Chart and Stitch Counts

Use the symbol and DMC number together when reading the chart. Screen colours and printed swatches are approximate.

SymbolDMC numberColourStitch count
OB5200Snow White1,911
C712Cream1,555
R321Red999
G815Medium Garnet769
T3808Ultra Very Dark Turquoise1,048
+3810Dark Turquoise226
P754Light Peach478
Y743Medium Yellow70
B433Medium Brown616
V3345Dark Hunter Green115
X3799Very Dark Pewter Gray776
S932Light Antique Blue289

These are stitch counts, not measured thread requirements. Thread use changes with fabric count, strand count, stitching route and how often you start and finish a length.

How to Cross Stitch the Christmas Gonks

1. Prepare Your Fabric

Check that your fabric is the correct count, then cut it to size.

Overcast or zigzag the outside edges to reduce fraying. Keep this edge stitching well away from the area you plan to display.

Fold the fabric gently in half horizontally, then vertically, to locate its centre. Mark that point with a loose temporary thread.

If you are new to choosing fabric and planning your layout, our guide to common cross stitch mistakes covers useful things to consider before stitching.

2. Find the Centre of the Chart

The chart centre lies:

  • Between columns 90 and 91
  • Between rows 60 and 61

That intersection corresponds to the centre you marked on your fabric.

The grid numbers label the boundaries of the chart. Columns and rows are counted from the top left, with the first square immediately after the zero boundary.

You do not have to make your first stitch at the centre itself. Choose a nearby marked square, count its position carefully from the centre, and start there.

3. Add an Optional Ten-Square Grid

The bold chart lines divide the pattern into blocks of ten squares.

If you find counting difficult, add a matching temporary grid to your fabric using a removable thread intended for gridding. Count ten fabric squares between grid lines, checking both directions.

Avoid ordinary pencil or permanent pen. Any fabric marker should be tested on a scrap and used according to its removal instructions.

4. Place the Fabric in Your Hoop

Position the area you want to stitch inside the hoop and tighten it until the fabric is evenly supported.

It should feel firm without being stretched out of shape. Keep the surrounding fabric clean and rolled away from your working hand.

A smaller hoop is perfectly suitable, provided you move it as you work. Release the tension between sessions.

5. Prepare Two Strands of Floss

Cut a manageable length of embroidery cotton, approximately 40–45 cm.

Separate one strand at a time from the six-strand length, then bring two strands back together and thread the needle.

For a simple start, leave a short tail at the back and secure it beneath the backs of your first few stitches. Hold it in place until it is caught securely.

Avoid a bulky knot if you intend to mount the finished piece flat.

6. Work Your First Cross Stitches

Bring the needle up through the lower-left hole of a fabric square and down through the upper-right hole.

Then come up through the lower-right hole and go down through the upper-left hole. You have completed one X.

Keep this order consistent throughout the project so the top legs all lean the same way.

For a row of stitches in one colour, you can work the first diagonal across the row, then return to complete the crosses. Pull the thread gently into place without tightening it enough to distort the fabric.

7. Stitch in Manageable Sections

Work through the design a small area at a time, checking your position against the bold grid lines.

A practical approach is to:

  1. Establish a coloured section near the centre.
  2. Complete nearby hat or coat areas.
  3. Add the adjoining white and cream stitches.
  4. Work the noses, mittens and accessories.
  5. Check scattered details against the chart.

You can choose a different order if it suits your stitching habits. The important part is keeping each new area correctly positioned.

Do not assume matching-looking sections are identical. Count both sides of a hat or beard separately.

8. Change Colours Without Long Floats

When a length is finished, pass the needle beneath several completed stitches on the back, then trim the remaining tail.

Start a fresh length when the next section is a long distance away, particularly if dark thread would travel behind unstitched pale fabric.

Those travelling threads can show through the front, and this design has plenty of open background where they would be noticeable.

9. Stitch Both Pale Shades

The beards and pale details use B5200 Snow White and 712 Cream.

Keep both colours unless you deliberately want to simplify the pattern. Their contrast helps separate the beard shapes and hat details.

A pale-coloured square containing a symbol is still a stitch. Only empty chart squares are left unworked.

10. Check the Finished Chart

Before removing the fabric from your hoop, compare the stitching with the chart one ten-square block at a time.

Check for missed symbols, incomplete crosses and misplaced colour changes. Pay particular attention to the small lantern, gift and tree details.

If a mistake affects the position of everything beside it, correct it before continuing. One square out can become quite a determined little problem.

Washing and Pressing Your Finished Cross Stitch

Check that your fabric and threads are suitable for washing, especially if you have substituted any materials. Test spare thread for colourfastness first.

If washing is appropriate, use cool to lukewarm water and a small amount of mild detergent suitable for needlework. Rinse gently, following any gridding-marker removal instructions.

Do not scrub, twist or wring the stitching.

Roll it in a clean towel to remove excess water, then lay it flat to dry. Press from the reverse on a padded towel, using a suitable temperature and a pressing cloth.

Our guide to washing and ironing cross stitch projects has more finishing advice.

How to Display Your Christmas Gonk Cross Stitch

Frame It for Christmas

A rectangular frame suits the group of three characters. Choose the frame after measuring the completed piece and deciding how much fabric you want visible around it.

Mount the fabric evenly over acid-free board, keeping its weave straight. Leave a gap between the stitching and any glass.

Make a Christmas Cushion Panel

Use the finished embroidery as a central panel with coordinating quilting cotton borders.

Keep construction seams outside the chart area. Plan the cushion dimensions, backing and seam allowances before trimming your embroidery.

For a decorative cushion, a removable cover makes future cleaning much easier.

Create a Fabric Wall Hanging

Add fabric borders, backing and a hanging sleeve for a lightweight seasonal decoration.

Teal checks, a small cranberry print or simple oatmeal linen would complement the colours without competing with the stitching.

Can Beginners Make This Pattern?

Yes, if you are comfortable counting from a chart and changing thread colours. Every marked square is a full cross stitch, with no fractional stitches or backstitch required.

However, the small colour changes make this more involved than a first project with large solid blocks. Take it slowly, use the ten-square grid and keep your place marked.

Can I Change the Colours?

You can substitute shades, but keep some contrast between the two reds, the two turquoise colours, and the white and cream.

Test substitutions beside your fabric before starting. A thread that looks lovely on a bobbin can disappear against a similarly coloured background.

Does the Chart Have to Print at Actual Size?

No. You count chart squares rather than transferring their printed measurements onto the fabric.

Print at a size you can read comfortably. A single-page print may make the symbols too small, so use a tiled or poster-print option where available, or zoom into the downloaded image on a tablet.

The fabric count determines the size of the embroidery.

There’s no need to rush these little fellows. Settle into one section at a time, keep your threads labelled and enjoy watching their hats and beards take shape. By the time all three are finished, you’ll have a cheerful piece of handmade Christmas decorating ready to bring out each year.

Categories

Book Reviews Christmas Craft Businesses Craft Inspirations Craft News and Events Cross-Stitch Patterns & Charts Cross-Stitch Product Reviews Cross-Stitch Website Reviews Dogs & Cats Easter flowers Free Patterns Halloween More Cross Stitch Product Reviews spring Subversive Thanksgiving Tutorials and Patterns valentines day

RSS feed: More Articles More Articles

  • 10 Fall-Themed Thank You Cards and Gift Card Holders to Make
  • DIY Leaf Imprint Pottery Soap Dish – Green Glazed Botanical Design
  • Free Crochet Snowman Patterns for Gifts and Winter Décor
  • Weasley Sweater Knitting Tutorial Review: Plan Your Own Personalised Christmas Jumper
  • 10 Elephant Cross Stitch Patterns for Sweet Gifts and Beautiful Wall Art
  • Calendrier de l’Avent Scrapbooking: Make a Christmas Envelope Calendar
  • Free Christmas Postage Stamp Digital Stamps (Vintage, Modern and Religious Printables)
  • 10 Cosy Leg Warmer Knitting Patterns for Warm Legs and a Little Retro Charm
  • DIY Vanilla Sugar Cookie Body Scrub – A Christmas Holiday Sweet Treat for Your Skin
  • Christmas on a Budget – 10 Christmas Gifts You Can Sew Using Scrap Fabric

Pick Your Blog

  • Sewing
  • Knitting
  • Quilting
  • Crochet
  • Home & Garden
  • Recycled Crafts
  • Scrapbooking
  • Card Making
  • Polymer Clay
  • Cross-Stitch
  • Edible Crafts
  • Felting
  • Glass Art
  • Indie Crafts
  • Kids Crafts
  • Jewelry Making
  • Lesson Plans
  • Needlework
  • Bath & Body
  • Party Ideas
  • Candle Making
  • DIY Weddings
  • Not Craft
  • Free Craft Projects

Copyright © 2026 · CraftGossip | Start Here | Contact Us | Link to Us | Your Editors | Privacy and affiliate policy