• Home
  • Suggest A Craft
  • DIY Newsletter

Cross-Stitch

Charts, patterns and everything needlepoint

  • About CraftGossip
  • Our Network
    • Bath & Body Crafts
    • Candle Making Ideas
    • Crochet Ideas
    • Cross Stitch
    • Edible Crafts
    • Felting Patterns
    • Glass Art
    • Home & Garden Ideas
    • Indie Crafts
    • Jewelry Making
    • Kids Crafts
    • Knitting Patterns
    • Lesson Plans
    • Needlework
    • Party Ideas
    • Polymer Clay
    • Quilting Ideas
    • Recycled Crafts
    • Scrapbooking
    • Sewing Patterns
    • Card Making
    • DIY Weddings
    • Not Craft Ideas
  • Giveaways
  • Roundups
  • Store
  • Search

To Ways to Back a Hoop to Frame Cross Stitch

June 15, 2024 by Sarah White

A popular way to finish embroidery and cross stitch patterns is to frame them in the hoop you stitched them in. This is an easy way to finish projects and you can make it a little fancier by painting the hoop on the outside to add more color.

The only potential issue with framing your cross stitch in this way is that you might not want to see — or let other people see — what the back of your cross stitch project looks like. I know my projects are generally a mess from the back, so it’s nice to take an extra step and cover the back of the hoop so you can’t see the back of the stitching.

There are a couple of different ways to do this, and thankfully Crewel Ghoul has us covered.

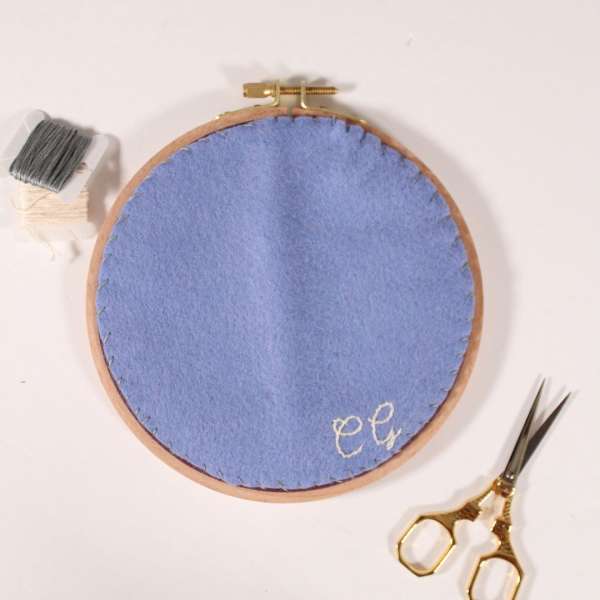
Probably the easiest way to add back fabric to your cross stitch hoop is by using felt. This method as shown in the blog post has you stitch down the felt to the edge of the cross stitch fabric that is secured to the inside of the hoop. It takes a little time to sew it down, but the benefit is that it can be removed if you ever decide you want to frame the project in a different way or you don’t want to display that piece any more but you want to reuse the hoop.

The other option is to use fabric on the back. In this version they use glue instead of stitching to hold the fabric down, but that makes this method more permanent. You can also do the same method as with the felt and just sew the backing down by hand if you want it to be more easily removable.

Gluing it down is a great option when giving a cross stitch project as a gift because then the person you’re giving it to will never see the back side of your work and it might be more secure to back it this way.

Have you ever used either of these methods? I’d love to hear about it!

[Photo: Crewel Ghoul]

Next Pattern:

  • 35+ Sunflower Cross Stitch Patterns
«
»

Have you read?

Crow Cross Stitch Patterns

In all my years writing about cross stitch, I don’t think I’ve ever had a post dedicated to crow cross stitch patterns. That’s a shame, because crows are cool, and they’re a great motif to use in the fall that has a bit of a Halloween/spooky vibe without necessarily being all pumpkins and ghosts (though we have some of that, too). 

Actually, these little crow cross stitch patterns from LaSelva Design could be up in the house year round, especially if you’ve made friends with crows or are trying to cultivate your own murder. This set of four patterns is each worked in four colors, and they’re shown in 3-inch hoops, though they vary in size a little bit. 

This Art Nouveau crow from Needle Lot Designs is stunning and reminds me a bit of a tarot card. It would be the perfect thing to stitch for a witchy friend. It measures 74 by 98 stitches, which comes out to 5.25 by 7 inches or 13.4 by 17.8 cm on 14 count fabric. It uses 14 colors and has no backstitching. 

Or keep it monochrome with PandoraXstitch‘s cross cross stitch pattern. I love how this one looks like a woodcut, and it shows you that even stitching in a single color you can make something really interesting. This design is 283 by 284 stitches, which is a little more than 20 inches or 51.5 cm not quite square on 14 count fabric. The pattern includes measurements for other counts if you want to make it a different size. 

The Book of Lost Keys design from Haunted Frames feels a little more Halloween, but it doesn’t have to be. It tells the story of a mama crow whose baby is locked in a cage, but the mama has the key. The design is shown worked on 18 count fabric and measures 109 by 79 stitches. That’s 6.1 by 4.4 inches, or about 15.5 by 11 cm. It uses four colors of regular floss as well as gold metallic floss. 

Speaking of more Halloween, I love this spooky cake stand featuring a crow and other characters from Ulysses Blue Stitching. You’ll find a creepy cake, eyeball in a jar, owl, ghosts and more haunting this house. It uses nine colors and measure 109 by 143 stitches. That’s 7.4 by 9.8 inches or 19.78 by 25.94 cm on 14 count fabric. 

I also like this kind of folk art crow (or raven as the pattern calls it) sitting on a pumpkin from MIYAstitch. This one measures a manageable 71 by 81 stitches and uses seven colors. On 14 count fabric it comes out to a little more than 5 by almost 6 inches (or 13 by 15 cm). 

Another pumpkin and crow pattern (this time with a witch hat) comes from My Lovely Embroidery MB. This dare I say cute design uses seven colors as well ans is 81 by 80 stitches. That measures 5.79 by 5.71 inches, or 14.7 by 14.51 cm, on 14 count fabric. This one uses full and three-quarter stitches as well as French knots. 

Categories

Book Reviews Christmas Craft Businesses Craft Inspirations Craft News and Events Cross-Stitch Patterns & Charts Cross-Stitch Product Reviews Cross-Stitch Website Reviews Dogs & Cats Easter flowers Free Patterns Halloween More Cross Stitch Product Reviews spring Subversive Thanksgiving Tutorials and Patterns valentines day

RSS More Articles

  • DIY Pottery Clay Sardines with Hand-Drawn Designs
  • Learn about Costa Rica for Kids
  • Trick or Treat in Style with the Free Happy Jack Treat Bag Pattern
  • DIY Eyeball Plant – Creepy Halloween Craft with Ping Pong Balls
  • DIY Milk Jug Halloween Skeleton Faces – Day of the Dead Inspired
  • 13 Witchy Halloween Card Ideas using Stamps and Dies
  • Create Personalized Dish Towels with DIY Infusible Ink: A Simple Craft Idea
  • DIY Clay Egg Tray – Handmade Farmhouse Charm for Your Kitchen
  • Textured Hat Knitting Patterns
  • Free Crochet Skull and Bones Granny Square Pattern

Pick Your Blog

  • Sewing
  • Knitting
  • Quilting
  • Crochet
  • Home & Garden
  • Recycled Crafts
  • Scrapbooking
  • Card Making
  • Polymer Clay
  • Cross-Stitch
  • Edible Crafts
  • Felting
  • Glass Art
  • Indie Crafts
  • Kids Crafts
  • Jewelry Making
  • Lesson Plans
  • Needlework
  • Bath & Body
  • Party Ideas
  • Candle Making
  • DIY Weddings
  • Not Craft
  • Free Craft Projects

Copyright © 2025 · CraftGossip | Start Here | Contact Us | Link to Us | Your Editors | Privacy and affiliate policy