• Home
  • Suggest A Craft
  • DIY Newsletter

Cross-Stitch

Charts, patterns and everything needlepoint

  • About CraftGossip
  • Our Network
    • Bath & Body Crafts
    • Candle Making Ideas
    • Crochet Ideas
    • Cross Stitch
    • Edible Crafts
    • Felting Patterns
    • Glass Art
    • Home & Garden Ideas
    • Indie Crafts
    • Jewelry Making
    • Kids Crafts
    • Knitting Patterns
    • Lesson Plans
    • Needlework
    • Party Ideas
    • Polymer Clay
    • Quilting Ideas
    • Recycled Crafts
    • Scrapbooking
    • Sewing Patterns
    • Card Making
    • DIY Weddings
    • Not Craft Ideas
  • Giveaways
  • Roundups
  • Store
  • Search

Cross Stitch for the Beach

May 19, 2025 by Sarah White

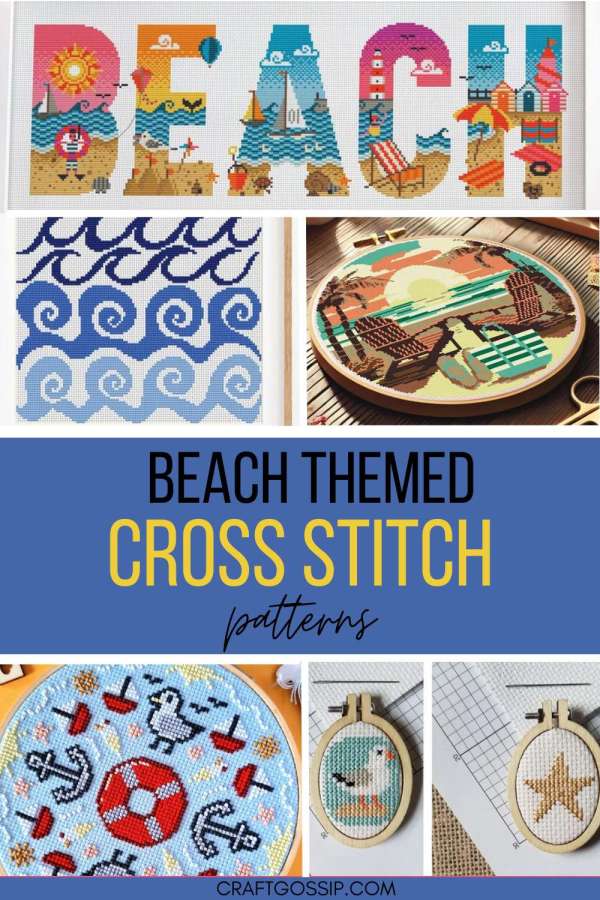
This time of year I always start thinking about vacations, and while I don’t think I’ll be seeing the beach this year, I could stitch up one of these beach themed cross stitch patterns, which would be perfect if you live near the beach or have a beach house to decorate.

First there are these teeny projects from Bella Rose Craft. This set of minis includes a seagull and a starfish, and they are each shown in their own 1.5 by 2 inch/3.8 by 5 cm frames, though the pattern has them together on one chart. The gull is 17 by 20 stitches and the starfish is 16 by 16.

Speaking of seagulls, I love this little seagull sampler that also includes anchors, sailboats and a life preserver, among other summer symbols. This one is from Bees on Toast Shop (would love to know the story of that name!) and uses only full cross stitches and 8 colors. The sample is shown in a 6-inch hoop.

If you want to get literal with your beach stitching, try this project that says beach and includes sand, sea, sun and lots of other fun stuff within the letters. The design is from Stitchrovia and measures 252 by 85 stitches. On 14 count fabric that would be 18 by 6.1 inches, or 45.7 by 15.4 cm. Sizing for other fabric counts are included if you want to make yours smaller. The pattern uses 21 colors.

Stitch up a project that says “wish you were here” or “wish I were there” with this one from The Little Art Veranda. It shows two chairs on the beach in front of what I’ve decided is the sunset (which kind of looks like an egg, but I like it). It uses 9 colors and only full cross stitches. It’s 140 by 140 stitches and fits perfectly in a 10 inch hoop if stitched on 14 count fabric.

Or make the beach modern art with this fun wave design from Box and Fox worked in three shades of blue. It measures 110 by 10 stitches, which is 7.8 inches or 19.96 cm square on 14 count fabric. Despite the dramatic look this would be a great option for someone new to cross stitch.

Next Pattern:

  • 35+ Sunflower Cross Stitch Patterns
«
»

Have you read?

Check Out This Great Method for Framing Cross Stitch

When you put all the time and energy you do into making a great cross stitch project, it’s worth taking the time to frame it in a way that will make it look its best.

Often for smaller designs we’ll choose to frame projects in a hoop, which is cute and a fine option, especially for seasonal projects you might want to change out through the year. Others will send their finished projects for professional framing, which is a great option for gifts and heirloom items that need to be preserved, but it can also be quite expensive.

Crewel Ghoul has a great tutorial for a way that you can easily frame your cross stitch projects at home with just a few supplies.

She uses adhesive mounting board (but you can use non-adhesive board if you have some one hand or you need a size that’s not available in an adhesive version) and a few other basic supplies to secure the sides and corners of the cross stitch fabric around the board before putting the design in the frame.

This requires a bit of hand sewing, but we’re cross stitchers so I’m sure we can handle that.

Framing your cross stitch like this gives it a little padding in the frame, which makes it look better than if it were just flat in a frame with no special finishing. It’s also a great idea to use a frame without glass or to leave the glass out of the frame so it doesn’t crush your stitches.

And though this is super secure it’s not 100 percent permanent if you decide you don’t want the project framed in that way any more. Or you can take it out of the frame and the edges are still all nicely finished so you can display it a different way without having to do anything else to it.

Check out the tutorial at Crewel Ghoul.

[Photo: Crewel Ghoul.]

Categories

Book Reviews Christmas Craft Businesses Craft Inspirations Craft News and Events Cross-Stitch Patterns & Charts Cross-Stitch Product Reviews Cross-Stitch Website Reviews Dogs & Cats Easter flowers Free Patterns Halloween More Cross Stitch Product Reviews spring Subversive Thanksgiving Tutorials and Patterns valentines day

RSS More Articles

  • Etsy Spotlight – Sew Your Dream Cottagecore Midi Dress with This Beautiful Sewing Pattern
  • How to Make a Garden Planner with Scrapbook Supplies
  • Learn about China for Kids
  • Check Out This Great Method for Framing Cross Stitch
  • Teddy Family – Free Crochet Patterns
  • Book Review – Americana Quilts
  • Add a Splash of Joy to Your Crafts with The Big Book of Happy Crafts
  • 5 FREE Die Cut Father’s Day Interactive Cards
  • DIY Purse with Cricut Maker: A Fun and Easy Sewing Project
  • Free Pattern – Queen Anne’s Lace Meadow

Pick Your Blog

  • Sewing
  • Knitting
  • Quilting
  • Crochet
  • Home & Garden
  • Recycled Crafts
  • Scrapbooking
  • Card Making
  • Polymer Clay
  • Cross-Stitch
  • Edible Crafts
  • Felting
  • Glass Art
  • Indie Crafts
  • Kids Crafts
  • Jewelry Making
  • Lesson Plans
  • Needlework
  • Bath & Body
  • Party Ideas
  • Candle Making
  • DIY Weddings
  • Not Craft
  • Free Craft Projects

Copyright © 2025 · CraftGossip | Start Here | Contact Us | Link to Us | Your Editors | Privacy and affiliate policy