• Home
  • Suggest A Craft
  • DIY Newsletter

Cross-Stitch

Charts, patterns and everything needlepoint

  • About CraftGossip
  • Our Network
    • Bath & Body Crafts
    • Candle Making Ideas
    • Crochet Ideas
    • Cross Stitch
    • Edible Crafts
    • Felting Patterns
    • Glass Art
    • Home & Garden Ideas
    • Indie Crafts
    • Jewelry Making
    • Kids Crafts
    • Knitting Patterns
    • Lesson Plans
    • Needlework
    • Party Ideas
    • Polymer Clay
    • Quilting Ideas
    • Recycled Crafts
    • Scrapbooking
    • Sewing Patterns
    • Card Making
    • DIY Weddings
    • Not Craft Ideas
  • Giveaways
  • Roundups
  • Store
  • Search

How to Cross Stitch on Paper

January 22, 2024 by Sarah White

One of the crafts I want to try more of this year is embroidery on paper. It’s a fun way to add texture to a collage or just make a picture funnier or more interesting. I have this idea of trying to embroider on a canvas I’ve painted, but I don’t know if I’ll take it taht far.

For our purposes, doing cross stitch on paper is a fun way to make greeting cards or something to add to other projects.

There are a few different options when it comes to cross-stitching on paper. The first is to buy and use perforated paper made for cross stitch. This paper is heavy weight and I have seen it in 14 count and 18 count varieties.

You can stitch on the paper pretty much the same way you would stitch on fabric, but check out this post from Catkin and Lillie for more details on how to stitch on perforated paper, how to finish projects you make with it and what to use them for. 

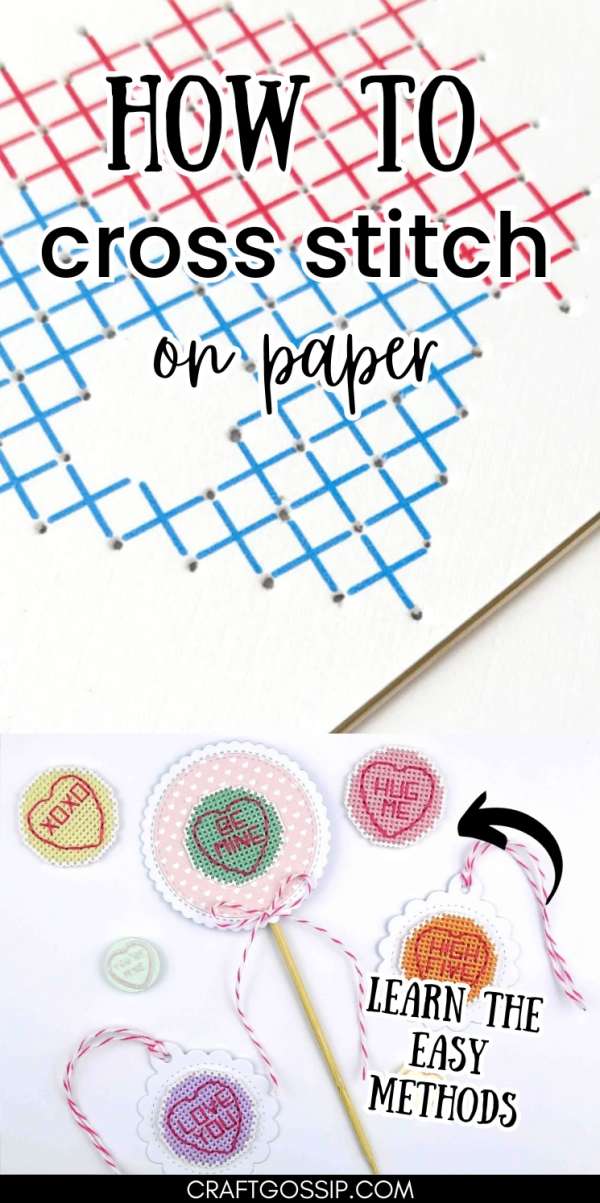
They also have a conversation hearts cross-stitch pattern in their free pattern section (scroll to the bottom) that was made to use on perforated paper if you want to practice.

Another option is to use heavy weight paper and add your own holes to stitch in. Stitched Modern has a simple little house cross stitch pattern that they use as a tutorial for how to stitch on paper. In this case you’ll print out the pattern and use the image as a guideline to form your holes.

In this case you’re literally stitching on top of the pattern, but you can also print the pattern out on thinner paper and use it as a guide for where to put your holes (or just measure and draw a faint grid on the back of your paper so you can evenly space your holes) and then stitch the design from there.

Have you ever done cross stitch on paper? I’d love to hear about it!

[Photos via Catkin and Lillie and Stitched Modern]

Next Pattern:

  • How and Why to Cross Stitch on Plastic Canvas
«
»

Have you read?

Quick Tip: How to Keep Cross Stitch Fabric from Fraying

One of the most common problems that cross stitchers at all skill levels have is that the cross stitch fabric can start fraying while you stitch.

Beginner cross stitchers might wonder why this happens and if there is something they are doing wrong to cause it.

The reason cross stitch fabric frays is because it is a woven fabric, and the nature of any kind of woven fabric (whether that’s cross stitch fabric, a torn up towel or a piece of fabric you’re going to sew) is that it wants to fray.

It’s not necessarily a huge deal if you cross stitch fabric starts fraying mid-project if you have left a lot of extra fabric around your stitching. But if there’s not much fabric to spare in order to be able to finish the project the way you want, you’ll want to do something to stop the fraying.

When I was growing up I remember my mom using masking tape for this purpose, but it turns out there are lots of different things that you can do to stop your cross stitch fabric from fraying.

Craft with Cartwright came up with 15 different things that you can try, which seems like a lot, but that just means you have lots of different things you can try.

If you don’t want to buy something, you can stitch along the edges. If you already have supplies like tape or glue, or access to pinking shears or a serger, there are lots of options you can try.

Some of these are more permanent than others, so it will depend a little bit on how you want to finish your cross stitch project as to which is the best choice for you. It’s a great idea to read through the whole list just so you can have them in the back of yoru mind the next time you start a project and think about how you would like to protect it.

You can find the whole list at Craft with Cartwright.

How do you like to stop fraying on your cross stitch projects? I’d love to hear your thoughts.

[Photo: Craft with Cartwright]

Categories

Book Reviews Christmas Craft Businesses Craft Inspirations Craft News and Events Cross-Stitch Patterns & Charts Cross-Stitch Product Reviews Cross-Stitch Website Reviews Dogs & Cats Easter flowers Free Patterns Halloween More Cross Stitch Product Reviews spring Subversive Thanksgiving Tutorials and Patterns valentines day

RSS More Articles

  • Quick Tip: How to Keep Cross Stitch Fabric from Fraying
  • Cute Donut Monkey Crochet Kit
  • FREE Beautiful Mermaid Digital Stamp Download
  • Making Popsicle Stick Playing Cards – Surprisingly Fun and Totally Charming!
  • Book Review: Sewing Made Simple: Craft Your Own Clothes with Confidence
  • 12 Scrapbook Layouts with Lots of Layers
  • Cat Themed Learning Activities
  • The Panel Quilting Workshop: 12 Quick-and-Easy Quilting Ideas
  • DIY Beaded Garden Stakes
  • Free Jelly Fish Crochet Pattern

Pick Your Blog

  • Sewing
  • Knitting
  • Quilting
  • Crochet
  • Home & Garden
  • Recycled Crafts
  • Scrapbooking
  • Card Making
  • Polymer Clay
  • Cross-Stitch
  • Edible Crafts
  • Felting
  • Glass Art
  • Indie Crafts
  • Kids Crafts
  • Jewelry Making
  • Lesson Plans
  • Needlework
  • Bath & Body
  • Party Ideas
  • Candle Making
  • DIY Weddings
  • Not Craft
  • Free Craft Projects

Copyright © 2025 · CraftGossip | Start Here | Contact Us | Link to Us | Your Editors | Privacy and affiliate policy

Copyright © 2025 · Sprinkle Theme on Genesis Framework · WordPress · Log in