• Home
  • Suggest A DIY
  • DIY Newsletter

Cross-Stitch

Charts, patterns and everything needlepoint

  • About CraftGossip
  • Our Network
    • Bath & Body Crafts
    • Candle Making Ideas
    • Crochet Ideas
    • Cross Stitch
    • Edible Crafts
    • Felting Patterns
    • Glass Art
    • Home & Garden Ideas
    • Indie Crafts
    • Jewelry Making
    • Kids Crafts
    • Knitting Patterns
    • Lesson Plans
    • Needlework
    • Party Ideas
    • Polymer Clay
    • Quilting Ideas
    • Recycled Crafts
    • Scrapbooking
    • Sewing Patterns
    • Card Making
    • DIY Weddings
    • Not Craft Ideas
  • Giveaways
  • Roundups
  • Store
  • Search

How to Use Sticky Board to Mount Cross Stitch Projects

December 27, 2023 by Sarah White

There are lots of different ways that you can prepare your finished cross stitch for display. You can leave it in the hoop you stitched it in, maybe sewing the edges of the fabric to each other or otherwise securing them on the back side so the edges won’t fray and so they are out of the way.

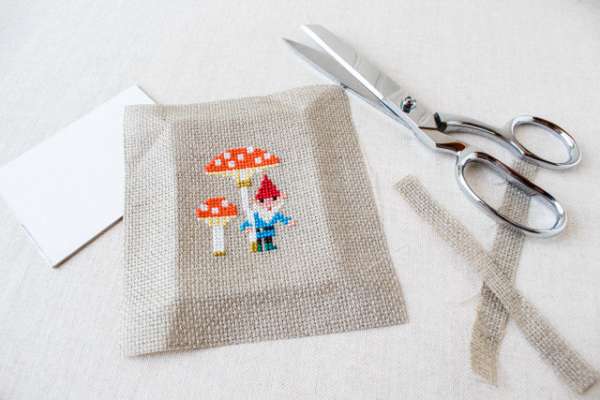
Small projects can be turned into cards or bookmarks, or mounted in frames made for keychains.

You can turn a project into a pillow, pincushion or ornament by sewing fabric to the back and (probably) adding a bit of stuffing or batting between the layers to give it a bit more dimension or to turn it into a pillow or pincushion.

Of course you can also frame your cross stitch projects, in a picture frame, with a mat or even both.

One way to make that easier to do is by using sticky board (or mounting board) on the back of your project. This is a product you can buy online or in craft stores that’s basically like cardboard but it’s sticky on one side. While it comes in standard sizes you can also cut it with a box cutter or craft knife if you need a smaller size.

Stitched Modern has a great tutorial for using this product to help you frame your cross stitch project. The mounting board holds down the raw edges on the back of the work, giving it a smooth and secure finish without having to do any sewing or other finishing.

The product is also acid free so it won’t harm your project. It’s a great way to frame projects you’re giving as gifts or plan to display long term because the fabric will be extra secure in the frame with this extra bit of support on the back.

Have you ever used this technique? I’d love to hear about it.

[Photo: Stitched Modern]

Next Pattern:

  • Ways to Display Your Cross Stitch Projects
«
»

Have you read?

Cross Stitch Ice Cream and Frozen Treats

Summer is the time for sweet treats, whether eating them or stitching them. This collection of patterns is full of designs that are good enough to eat. Almost. 

This year of ice creams from Simone Balman Art is lots of fun, and you could also stitch up these treats individually if you’d rather. The full piece is 210 by 300 stitches, though it’s not full coverage. It uses 25 colors and comes out to 13.6 by 20.1 inches, or 34.5 by 51.2 cm, as shown on 14 count fabric. 

These mini Popsicles from Mariana Gonclaves ART as super sweet and quick to stitch. These would also be a fun border to another summer project. The full design is 43 by 46 stitches, which is 3.1 by 3.3 inches, or 7.8 by 8.3 cm, on 14 count fabric. 

Sam X Stitch has this fun sweet treat sampler, which again would be fun to stitch as individual pieces (maybe on napkins?). In all it calls for 18 colors and measures 153 by 153 stitches. That comes out to 10.93 inches or 27.75 cm on 14 count fabric. 

Another great sampler is this one with ice cream and other sweet treats from Cute Patterns by Maria. At 119 by 132 stitches total, working the full pattern would be about 8.6 by 9.4 inches, or 22 by 24 cm on 14 count fabric, and it uses 33 colors. You can also stitch individual designs, which range in height from 35 to 45 stitches, and in width from 11 to 28. 

This collection of four sundae patterns from Stichrovia would be fun to make for a kitchen or a teen’s room. Each pattern is around 40 by 50 stitches, so they should fit in a four or five inch hoop if worked on 14 count fabric. 

Or stitch up one of the treats from Stitch Chart Studio‘s collection of seven ice cream cross stitch patterns. These range in size and in number of colors needed, but most would fit in a five or six in hoop (and one in a four inch hoop). 

Categories

Book Reviews Christmas Craft Businesses Craft Inspirations Craft News and Events Cross-Stitch Patterns & Charts Cross-Stitch Product Reviews Cross-Stitch Website Reviews Dogs & Cats Easter flowers Free Patterns Halloween More Cross Stitch Product Reviews spring Subversive Thanksgiving Tutorials and Patterns valentines day

RSS More Articles

  • FIFA Soccer Crafts For Kids, Crochet Fans And Game-Day Makers
  • Cross Stitch Ice Cream and Frozen Treats
  • Sunflower Ribbon Embroidery Tutorials and Kits to Brighten Your Hoop
  • 15 Charity Sewing Projects That Let You Sew Something Useful For A Good Cause
  • Decorating Mistakes That Make Your Living Room Feel Cluttered
  • Remembering Jill Smokler, Founder Of Scary Mommy
  • In the Garden Layer Cake – A Bloom-Filled Fabric Collection for Spring Sewing
  • How To Do Kitchener Stitch: A Beginner-Friendly Guide To Grafting Knitting Seamlessly
  • Pattern Review: Georgie Granny Square Bucket Hat Crochet Pattern
  • Free Giant Squishy Octopus Crochet Pattern

Pick Your Blog

  • Sewing
  • Knitting
  • Quilting
  • Crochet
  • Home & Garden
  • Recycled Crafts
  • Scrapbooking
  • Card Making
  • Polymer Clay
  • Cross-Stitch
  • Edible Crafts
  • Felting
  • Glass Art
  • Indie Crafts
  • Kids Crafts
  • Jewelry Making
  • Lesson Plans
  • Needlework
  • Bath & Body
  • Party Ideas
  • Candle Making
  • DIY Weddings
  • Not Craft
  • Free Craft Projects

Copyright © 2026 · CraftGossip | Start Here | Contact Us | Link to Us | Your Editors | Privacy and affiliate policy