• Home
  • Suggest A Craft
  • DIY Newsletter

Cross-Stitch

Charts, patterns and everything needlepoint

  • About CraftGossip
  • Our Network
    • Bath & Body Crafts
    • Candle Making Ideas
    • Crochet Ideas
    • Cross Stitch
    • Edible Crafts
    • Felting Patterns
    • Glass Art
    • Home & Garden Ideas
    • Indie Crafts
    • Jewelry Making
    • Kids Crafts
    • Knitting Patterns
    • Lesson Plans
    • Needlework
    • Party Ideas
    • Polymer Clay
    • Quilting Ideas
    • Recycled Crafts
    • Scrapbooking
    • Sewing Patterns
    • Card Making
    • DIY Weddings
    • Not Craft Ideas
  • Giveaways
  • Roundups
  • Store
  • Search

How to Weave a Short End in Cross Stitch

August 5, 2024 by Sarah White

I know we all know better than trying to stitch with what’s obviously a too-short piece of embroidery floss, but that’s also never stopped up from trying to stitch up every last inch of thread.

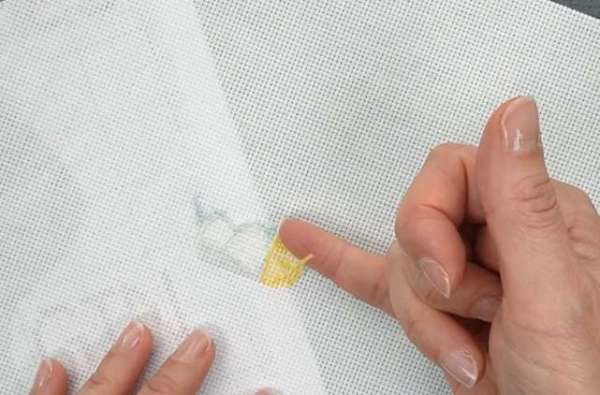
If you’ve played thread chicken, whether you won or lost, you’ve probably left yourself with a super short end of floss that you can’t thread onto a needle and weave in at the back like you normally would.

Generally when I do this to myself I separate the threads and try to tie a knot, which isn’t all that easy to do, probably isn’t really helpful, and it leaves you with a knot in the work (which I don’t care that much about, but I know some people do).

Of course there has to be a better way, right?

Some stitchers who are way more clever than we are surely have a technique for dealing with these little threads. Aside from being willing to join in new thread even when they’ve only got a few stitches left because it will be easier than messing with a tiny end, right?

If you’ve ever wondered about what to do with a tiny tail from a game of thread chicken, you need to check out this video from Catkin and Lillie. It will probably take you less time to watch than it took me to tell you about it, and I don’t want to spoil her method, so you’re going to have to click over to YouTube and watch it for yourself.

It’s definitely worth it for the both simple and life changing advice on offer. I know that sounds dramatic but the way you stitch is part of your life, so it’s going to change your life when you try this technique.

Go check it out on YouTube, and give them a subscribe for tons of helpful tips, techniques and floss tube episodes.

[Photo: Catkin and Lillie]

How to Cross Stitch on Linen

How to Stitch Whipped Back Stitch

Next Pattern:

  • How to Railroad Your Cross Stitch
«
»

Have you read?

Make Your Cross Stitch into an Iron On Patch

A while back I made a little rainbow cross stitch pattern and I wasn’t sure what I wanted to do with it, so I turned it into a patch. My idea was that it could be used on a jacket or backpack, or you could add a pin to the back and wear it temporarily on a shirt or elsewhere. 

But what if you want to make your design more permanent? Is it possible to turn a piece of cross stitch into an iron-on design?

It turns out yes, it is, and Sirious Stitches has done it so I didn’t have to try to figure it out on my own. 

The way they did it was by using HeatnBond, an iron-on adhesive that attaches fabrics without sewing. There was still sewing involved to finish the edges of the cross stitch fabric and make it look like a purchased patch. The post shows how to do this by hand or with your sewing machine. (I just did blanket stitch edging on mine, which doesn’t look like a “real” patch but is also a lot faster.)

Once you have the patch prepared it’s a pretty easy matter of using the fusible adhesive to the back of the patch so you can then iron it onto whatever jacket, pair of jeans, bag or whatever else you might want to add it to. 

I guess I’m a little paranoid about the washability of cross stitch projects, though you could hand wash anything with an iron-on cross stitch patch as you might need to with a purchased iron-on patch, anyway. But this does look really cool and is a great option if you know you want to permanently add a cross stitch patch to a garment of bag. 

Get the full tutorial over at Sirious Stitches. Would you add an iron-on cross stitch patch to something? I’d love to hear what you would use this technique for!

[Photo: Sirious Stitches]

Categories

Book Reviews Christmas Craft Businesses Craft Inspirations Craft News and Events Cross-Stitch Patterns & Charts Cross-Stitch Product Reviews Cross-Stitch Website Reviews Dogs & Cats Easter flowers Free Patterns Halloween More Cross Stitch Product Reviews spring Subversive Thanksgiving Tutorials and Patterns valentines day

RSS More Articles

  • King Sophie’s World – Where Photography Meets Embroidery in a Stunning Art Evolution
  • Child’s Granny Cardigan
  • Keto Just Got Crunchy: 17 Salty Snacks That Won’t Blow Your Macros
  • Handmade with a Past: Tuesday’s Top Recycled Etsy Find
  • How to Make Friendship Bracelets
  • 12 Christmas in July Card Ideas with Stamps and Dies
  • Master the Art of Quilting with a 9-Patch Quilt Block Tutorial
  • Knit a Great Button Down Shirt
  • The Ultimate List Of 35 Layer Cake Quilt Patterns
  • Allagash Set Hat Crochet Pattern

Pick Your Blog

  • Sewing
  • Knitting
  • Quilting
  • Crochet
  • Home & Garden
  • Recycled Crafts
  • Scrapbooking
  • Card Making
  • Polymer Clay
  • Cross-Stitch
  • Edible Crafts
  • Felting
  • Glass Art
  • Indie Crafts
  • Kids Crafts
  • Jewelry Making
  • Lesson Plans
  • Needlework
  • Bath & Body
  • Party Ideas
  • Candle Making
  • DIY Weddings
  • Not Craft
  • Free Craft Projects

Copyright © 2025 · CraftGossip | Start Here | Contact Us | Link to Us | Your Editors | Privacy and affiliate policy